
With BricsCAD it's faster for you to edit polylines, add vertices, manipulate sections, and more.
If you come from other CAD software you might be accustomed to editing polylines in quite a slow and convoluted manner and the more complex the polyline, the longer it takes to edit. However, BricsCAD offers you better solutions that reduce your work time. Keep reading to find out how.
The Quad
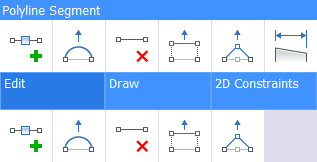
The Quad provides you with the fastest way of editing polylines. First, make sure that the Quad is switched on. Then simply hover over the segment that you wish to edit and hold Ctrl. All polyline editing commands will be displayed right where you need them: under your cursor. The Quad doesn't only display editing commands, all of the dimension and 2D constraint tools are also available in the Quad.

- Adjust Bulge convert a straight line to a curve OR change the curve of the selected arc.
- Stretch segment Keep the currently selected segment the same and manipulate the two connecting sections.
- Remove Segment Delete the current segment. (No gap is created).
- Add Vertex Add a new point to the line within the current section.
- Stretch Vertex Change the position of the current vertex.

Grips
BricsCAD also has another intuitive way to edit polylines: Grips! Begin by selecting the polyline you want to edit. The polyline will display as a dotted line and small markers or "grips" will appear. Squares indicate the vertices and triangles the midpoint. Simply click and drag the marker to manipulate the polyline. (Dragging the midpoint grips will change the bulge of the polyline.)

The grips are also fully customizable. Enter the Settings- Drafting-Display/Viewing-Grips section. Here you can change aspects such as their size and color.

Nearest Distance
Ever wished you could just resize a rectangle to an exact dimension without redrawing it? The good news is that with Nearest Distance you can! Hover over one side and hold Ctrl. Click to select and repeat for the opposite side. A box with the distance between the two sides is displayed. All you need to do is type in the new distance and BricsCAD resizes the rectangle.

The Manipulator
You might have already read about the Manipulator, but did you know it can also be used on segments of a polyline? Simply select the segment(s) that you need and then enter MANIPULATE into the command line. You can use it to move along an axis or to rotate.

PEdit
PE(PEdit), short for "polyline edit", allows you to edit polylines, 3D polylines, and 3D meshes, with even more options. It can even convert lines, arcs, circles, and splines to polylines. Simply access the command and select the desired entity. Use the 'multiple' option to select more than one line.
Note: The prompts of this command change, depending on the entity you are editing.
Edit vertices:
Next Move the X marker to the next vertex.
Previous Move the X marker to the previous vertex.
Angle Change the angle of the current segment. 0 is straight, >0 is counter-clockwise, and <0 is clockwise.
Break Remove segments from the polyline between the two vertices marked with X markers. This action turns closed polylines into open polylines and opens polylines into two polylines with a gap between them.
Note: This action cannot be undone.- Next/Previous/Select/Go -- enter an option to move the X marker along the polyline:
- Next vertex Next vertex
- Previous vertex Previous vertex
- Select Move the second X marker by clicking on the polyline
- Go break the polyline between the first and second marked vertices
Note: It's faster to use the BR(BREAK) command.
- Next/Previous/Select/Go -- enter an option to move the X marker along the polyline:
Insert vertex A dragline previews the location of the new vertex. Pick a point for the new vertex.
Move Move the current vertex. The dragline previews the new location of the vertex.
Note: It is much easier to move the vertices of a polyline with Grips.Regen Regenerate the polyline to show changes.
Select Move the second X marker by clicking on the polyline
Straighten Remove all segments between two vertices. When you select the start and end points of a multi-segment polyline, the entire polyline is straightened, becoming a single segment; this also applies to closed polylines.
Tangent Attaches a tangent direction to the marked vertex (used for curve fitting).
Width Change the width of the current segment. The "current segment" lays between the X-marked vertex and the next vertex.

Close
Close the polyline by adding a segment between the start and endpoints.
Open
Open a closed polyline by removing the last segment drawn to close the polyline.
Decurve
Reverses the effects the Fit and Spline options.
Fit
Fits a curve to the polyline.
Join
Add open entities to the selected polyline:
- Lines
- Arcs
- Polyline segments
- Helices
Note: This option works only with open and with cojoined entities. The joined entities take on the source polyline's properties, such as color, width, and layer.
Multiple polylines
Create one or more polylines with cojoined lines, polylines, and/or arcs in the selection set.
Linetype-mode
ON linetypes start and stop at the polyline's start and endpoints
OFF linetypes start and stop at each vertex
Note: This option is stored in the PLineGen variable.
Reverse direction
Reverses the direction of the polyline.
Spline
Convert the polyline into a spline.
Taper
Taper the width of the entire polyline from one end to the other.
Width
Change the width of all segments.
Note: 3D polylines cannot contain arc segments and cannot have width. This option overrides tapered widths.
Desmooth
Remove the Bezier-spline smoothing of 3D meshes.
Mclose
Close a 3D mesh in the m direction.
Mopen
Open the 3D mesh in the m direction.
Nclose
Close the 3D mesh in the n direction.
Nopen
Open the 3D mesh in the n direction.
ConvertPoly
Another option available to you with BricsCAD is the ConvertPoly command. It converts polylines between modern lightweight, classic polylines (heavyweight) 3D polylines and can be extremely useful for reducing a drawing size. In BricsCAD the polyline type is displayed above the properties field.

The line type is displayed above the Properties panel.
- 2D Polyline -- Heavy polyline
- Polyline -- Light polyline
- 3D Polyline -- 3D polyline
Ready to edit polylines in BricsCAD?
Easy to try, easy to buy, easy to own. That's BricsCAD®. Try all of our products, for free for 30 days at www.bricsys.com. Freedom of choice, plus perpetual (permanent) product licenses that work with all languages, in all places. You'll love what we've built for you with the BricsCAD® product family.
More Tuesday Tips:
- BricsCAD Trial Versions
- Glossary of CAD terms
- Reduce your work time with The Quad
- Save time with Propagate
- Edit polylines in BricsCAD
- Converting to .dwg
- BIMTags
- 11 -- ways to draw a square in BricsCAD
- A quick guide to DXF
- Solids, Surfaces, and Meshes
- Sweep
- Callouts, leader lines & balloons
- Automate Technical Drawing
- Orthographic Drawing from a 3D Model in 20 Seconds
- 'api-ms-win-crt-runtime-dll' Error while starting BricsCAD
- Everything you need to know about Render Materials in BricsCAD
- Transform 2D Entities with Stretch
- Move, Edit and Change Entities at Hyper Speed with BricsCAD
- The BricsCAD® Hotkey Assistant & Tips Panel

Rose is responsible for taking user feedback and improving the BricsCAD product. Before coming to BricsCAD, she was a CAD user and worked in the Automotive, Aerospace, and Defense industries as a Technical Illustrator. She loves finding out how things work, taking them apart, and (hopefully) putting them back together again.
