Customize Dialog Box in BricsCAD
The Customize dialog box is the primary place in which to customize BricsCAD --- to change the way it looks and works. This dialog box handles many customization tasks, including the following ones:
- Creating and changing toolbars, menus, shortcut menus, mouse and digitizer buttons, ribbon tabs and panels, workspaces, Quad cursor, rollover properties and tablet menus
- Writing and editing macros
- Creating and modifying keyboard shortcuts, command aliases and shell commands
- Importing and exporting full and partial menu files in .cui , .cuix, .icm, .mns and .mnu formats
This post will cover:
- Touring the Customize dialog box
- Understanding the CUIX customization file
- Accepting and rejecting changes to customization
- Reviewing the XML format
- Working with partial CUI files
The Customize dialog box is your one-stop-shop for customizing ribbons, macros and more. Here are some of the ways to access this important dialog box:
Enter Customize at the command prompt
Enter the alias cui (this is my preferred method)
Select Customize from the Tools menu
Right-click any toolbar or ribbon and then from the shortcut menu select Customize
This post introduces the Customize dialog box by providing an overview of its functions. Each of the nine following posts describe in turn how to customize the user interface as indicated by the tab name --- Menus, Toolbars, Ribbon and so on.

Tabs segregating customization of interfaces elements
BricsCAD stores information about the ribbons, macros and all the rest in .cui files, where "cui" is short for customize user interface. The program also reads menu files from AutoCAD® (.cuix, .mnu and .mns) and IntelliCAD® (.icm).
Aliases and shell commands are stored in a different format and in .pgp files.
Touring the Customize Dialog Box
The Customize dialog box has three primary areas (a.k.a. panes): customize, tools and properties.

Customize pane (on the left) lists items that can be customized; the content of this pane varies, depending on which tab is selected, whether "Menu" or "Shell Commands"

Customize pane, found in the left half of the dialog box
Tools pane (on the right) lists all of the commands found in BricsCAD; they are sorted according to menu order, for example, all file-related commands are listed under "File"

Tools pane, found in the right half of the dialog box
Properties pane (at the bottom) edits the properties, such as title, Diesel code, Help text, command macro and image associated with the currently-selected item; the content of this pane varies, depending on the tab and item

Properties pane, found at the bottom of the dialog box
ABOUT CUI FILES
Default.cui is the name of the file that defines the menus and toolbars of BricsCAD. It was developed by Autodesk®, which then switched to CUIX. The "X" indicates CUIX is a zipped package file that holds all the files needed by the user interface including icons. (It can be viewed with software like PkZIP or 7-Zip.)
CUI files are written in XML, which is short for eXtended Markup Language. XML is a file format that is an extension of HTML, the hyper text markup language used for Web pages. The format is in ASCII and looks just like HTML, but uses custom tags. Custom tags are used to identify the data stored in CUI files. For example, <Macro> identifies the start of a macro, while <\Macro> marks its end. Because it is like HTML , you can use any Web browser to parse CUI files. Because the format is written in plain text (as shown below) and because the XML specification requires that every piece of data be identified, CUI files are human-readable. Well, in theory; in practice, it quickly becomes tedious trying to read the content of CUI files, because of the repetitive nature of tags.
Bellow you see the first part of BricsCAD's default.cui file as written in XML format. This is the first of several dozen lines of a file that's 343 pages long in BricsCAD V20. I've boldfaced some of the macro-related items to help them stand out from the XML tags.
<CustSection xml:lang="en-US"><FileVersion IncrementalVersion="2" MajorVersion="0" MinorVersion="3" UserVersion="0"/><Header><CommonConfiguration><CommonItems><PartialMenuFile>C:\Users\rhg\Desktop\partial.cui</PartialMenuFile></CommonItems></CommonConfiguration><WorkspaceRoot></WorkspaceRoot></Header><MenuGroup Name="BRICSCAD"><MacroGroup Name="File"><MenuMacro UID="qnew"><Macro><Name>QNew</Name><Command>^c^c_qnew</Command><HelpString>Creates a new drawing from the current default template</HelpString><Image ID="qnew"/></Macro></MenuMacro><MenuMacro UID="new"><Macro><Name>New...</Name><Command>^c^c_new</Command><HelpString>Creates a new drawing</HelpString><Image ID="new"/></Macro></MenuMacro><MenuMacro UID="newwiz"><Macro><Name>New Wizard...</Name><Command>^c^c_newwiz</Command><HelpString>Creates a new drawing using 'Create New Drawing' wizard</HelpString><Image ID="__newwiz__"/></Macro></MenuMacro>
et cetera...
For the remainder of this post, I'll describe the parts of the Customize dialog box common to all areas. I begin at the top and then work my way to the bottom of the dialog box. Later posts describe unique content.
CUSTOMIZE'S MENU BAR
The top of the dialog box sports a menu bar with a single, lonely-looking menu item. The File menu lets you open and save full and partial .cui files.

The File menu on the menu bar
Click File to view the menu:

Options displayed by the File menu
Here are the task the menu items perform:
Load Main CUI File opens a .cui, .cuix, .mnu, or .icm file:
.cui Format in which BricsCAD stores customizations; also used by older releases of AutoCAD®
.cuix Format in which AutoCAD® currently stores customizations; "x" refers to an archive file, which includes CUI, image files and so on
.mnu Format in which the oldest releases of AutoCAD® stored customization; also used by many AutoCAD® work-alike programs
.icm Format in which IntelliCAD® originally stored customizations
Warning A new Main Cui file completely replaces the current one, thereby replacing all existing menus, toolbars, shortcut menus and so on.
ABOUT MAIN AND PARTIAL CUSTOMIZATION
The difference between "Main" and "Partial" customization files is subtle, but crucial:
Main file covers all the user interface elements governed by the Customize dialog box. Change the Main file and the entire user interface changes --- except for the portions defined by the Partial files, if any are loaded.
Partial file is like an appendix, an independent addition. Change the Partial file and only the parts it defines are changed; the rest of the user interface is unaffected. Partial files are used by third-party add-ons (and you!) for customizing the CAD program.
BricsCAD must have a Main file loaded for the user interface to exist; no Partial files need be loaded.
Save Main CUI File saves the current .cui file by another name.
TIP You don't need to use the Save Main CUI File option to save changes to customization, because BricsCAD saves them automatically when you click OK to exit the dialog box.
Load Partial CUI File opens a partial .cui file. The difference between a main and a partial file is that the contents of a partial .cui file are added to the existing user interface. This option is useful for adding menus and toolbars that were customized for add-on applications.
Create New Partial CUI File creates a (nearly) empty .cui file. Its sparse content is shown below:
<?xml version="1.0" encoding="UTF-8" standalone="no" ?><CustSection xml:lang="en-US"><MenuGroup Name="DEFAULT"/></CustSection>
Import Workspaces --- imports workspace info from .cui files.
TIP BricsCAD can import menu files from other CAD systems, such .cuix from recent releases of AutoCAD®, .mnu from older AutoCAD® systems and IntelliCAD®'s .icm files.
These are imported through the File | Load Main CUI File option. In the Files of Type droplist, choose the other format.
CUI Customization Files
As BricsCAD store customizations in .cui files, it shows the name of the current one in the filed next to Main Customization File:

Location of the primary customization file in Windows
This single default.cui file contains everything to do with menus, shortcut menus, toolbars, buttons, tablets, Quad cursor, ribbon and keyboard shortcuts--- except for aliases and shell commands, which are saved in a separate default.pgp file. Both of the CUI and PGP files can be exchanged with other BricscCAD users and with other CAD programs that read them, such as AutoCAD®.
The Browse button (at the end of the Main Customization File field) lets you load a different .cui file. You want to do this when you need to quickly change the user interface of BricsCAD.
Here is how to do this:
Click the ... button.
Choose a .cui, .cuix, .mnu, or .icm file from the Select a CUI File dialog box.
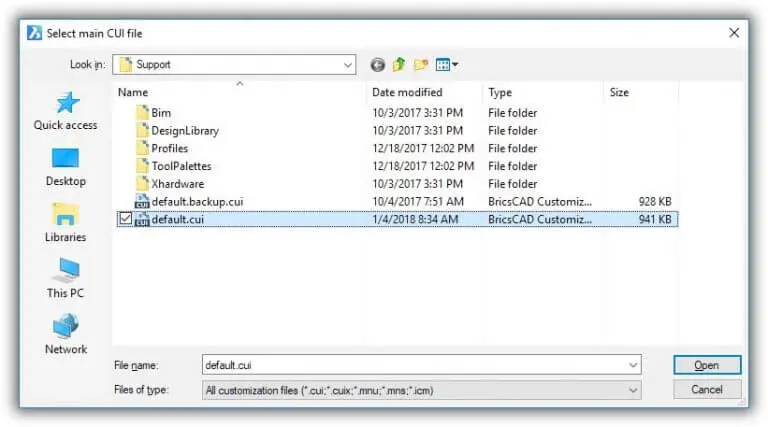
Selecting another user interface by opening another .cui file
Click Open. Notice that all of the user interface of BricsCAD changes immediately!
Aliases and shell command definitions are stored in a different file, called default.pgp. ("PGP" is short for program parameters, but rumor has it that it was nicknamed the "pigpen" file.) Click the "Command Aliases" or "Shell Commands" tab to see the location of the .pgp file:

Path to the default.pgp file
In Windows, the default.cui files are found in these folders:
Original files C:\Program Files\Bricsys\BricsCAD V20 en_US\UserDataCache\Support\en_US
Working copy C:\Users<login>\AppData\Roaming\Bricsys\BricsCAD\V20x64\en_US\Support
The "original files" are the ones BricsCAD uses when you use the Windows Repair facility, as well as when you click the Revert to Defaults button. The "working copies" are the ones that get modified when you make changes using the Customize dialog box.
In Linux, the default.cui files are located in these folders:
Original file /opt/bricsys/bricscad/V20/UserDataCache/Support/en_US
Working copy /home/<login>/Bricsys/BricsCAD/V20x64/en_US/Support
In MacOS, the default.cui files are stored in these folders:
Original file /Applications/BricsCAD V20.app/Contents/MacOS/UserDataCache/Support/en_US
Working copy /Users/<login>/Library/Preferences/Bricsys/BricsCAD/V20x64/en_US/support
The default.cui file has a different name on MacOS and Linux systems:
default(windows).cui
default(linux).cui
default(mac).cui
SEARCH FOR COMMANDS
BricsCAD has hundreds of commands, but they are not listed alphabetically instead they are grouped by function, such as "2D Constraints" and "Annotations."

BricsCAD provides a search field to look for command names.

Searching for commands and descriptions
Enter a command name and it jumps to the command name in the Tools pane. So, you can type "objectscale" and it goes to the "Add/Delete Scales" item.
Press Enter to find the next use of the command name.
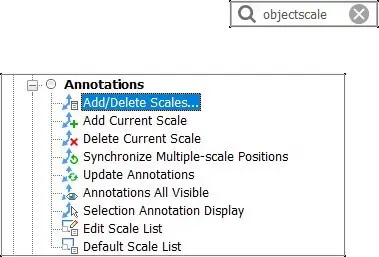
Searching for the ObjectScale command
TABS OF THE CUSTOMIZE DIALOG BOX
The Customize dialog box has a row of tabs that access the primary user interface elements:

Tabs segregating the customizations for different areas of the user interface
- Menus tab --- customizes menus, sub-menus and shortcut menus
- Toolbars tab --- customizes toolbars, buttons, flyouts and icons
- Ribbon tab --- customizes tabs and panels
- Keyboard tab --- customizes keyboard shortcuts
- Mouse tab --- customized mouse buttons and double-click actions
- Tablet tab --- customizes digitizer buttons and tablet menus
- Quad tab --- customize the Quad cursor
- Properties tab --- customizes rollover properties
- Workspace tab --- customizes the look of workspaces
- Aliases tab --- customizes command abbreviations
- Shell Commands tab --- customizes commands that run programs external to BricsCAD
When you choose a tab, the Customize dialog box displays the associated customizable content, as described fully in the following posts.
SHORTCUT MENUS
When you right-click different areas of the Customize dialog box, a number of shortcut menus become available. Different ones appear, depending on where you right-click in the dialog box. Some of these are illustrated by the figure below.

Shortcut menu that appear when different elements are right-clicked
Most of the options are self-explanatory, but there are two whose subtlety can get lost on me. These are Insert and Append. The difference between them is as follows:
Append --- adds the new item at the end of the list
Insert --- places the new item before the selected item
The process of customizing toolbars and menus is an identical process; the only difference is that menus have a few more options, such as check marks and gray text.
APPLY AND OK BUTTONS
When you make a change in the Customize dialog box, BricsCAD highlights it, turning the change to boldfaced text, such as for the Title field shown below. This is handy as it reminds you what has changed.

Changed parameters displaying boldface text
The boldfacing remains visible, however, only until the dialog box closes; the next time you open it, the text again looks normal. You commit changes to the customization by clicking the OK button:

OK and Cancel buttons
Here's what the buttons mean:
OK --- applies the changes and then exits the dialog box
Cancel --- reverses (undoes) the changes and then exits the dialog box
After you click OK, BricsCAD applies the changes to a copy of the default.cui file. This way, the original default.cui file is kept untouched.
VIEWING CHANGES MADE TO CUSTOMIZE
You can see a list of the changes made to the Customize dialog box, just as with the Settings dialog box. To see them, click the Manage Your Customizations button:

Accessing the changes to customizations
The Manage Customizations dialog box might initially look intimidating.

Managing customizations
The key understanding it, is to use the color coding to figure out what is going on. Near the bottom of the dialog box is a list of the colors and their meanings:

Color coding of changes to customizations
Green Element was added to the default customization set up
Blue Element was changed
Red Element was removed
So when you look at the left pane, you see in green the list of elements that changed, modified in blue and removed in red, if any.
List of changes by category
Here we see that the macrotext.cui and Macro Text elements were added, because they are shown in green, while Content Browser and Properties were changed (blue).
The next step is to examine what changes were made to the blue elements. To do so, follow these steps:
Select an element that is shown in green, such as Content Browser.
Cast a glance at the right-hand pane, which lists the properties of the selected element.

Changes to an element shown in blue
The properties that changed are shown in blue. In this case, the Display parameter was changed to "Yes."
The right-hand panel is view-only; you cannot change anything here, other than to accept or reject changes. To make a change, you have to go back to the Customizations dialog box.
- To accept the change, do nothing
- To reject the change, uncheck the element:

Checkboxes accepting and rejecting changes to customization
Additional Management Options
The two options in the lower-left of the dialog box offer these possibilities:

Buttons at the bottom of the dialog box
Retain Customizations button is a shortcut to turn on all the check boxes next to elements. Should you have turned off any of them, then clicking this button checking the boxes next to Content Browser, Properties and so on
Revert to Defaults button is a shortcut to turn off all checkboxes. BricsCAD pops up a tooltip to ask if you are sure, because it will it copt the untouched default.cui file over the modified ones.

Erasing all your changes and reverting to the original CUI content
Show Positional Modifications checkbox toggles the display of elements that have only changed their position in the Customize dialog box, a trivial change that otherwise clutters the content of this dialog box.

Toggling the display of position changes
When you turn it on, the dialog box looks like this:

All changes displayed, all of them
Click OK to exit the dialog box.
Using Partial Menus to Customize BricsCAD Correctly
The following seven posts show you how to change the contents of the Customize dialog box to modify the user interface. It is best, however, to make changes to a partial customization file, rather than the main "default.cui"one for a couple of good reasons:
- The primary default.cui file remains unchanged
- Your customization can be shared with other BricsCAD users
SETTING UP A NEW PARTIAL MENU
Before carrying out changes in the Customization dialog box, first create a new partial customization file in which you carry out your work. In the Customize dialog box, take the following steps:
From the File menu, choose Create New Partial CUI File.
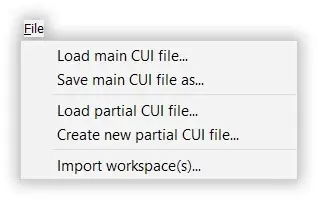
Starting to create a new partial customization file
Notice the Create a Customization File dialog box. Enter a name for the new .cui file, such as "MyCustomization," and then click Save.
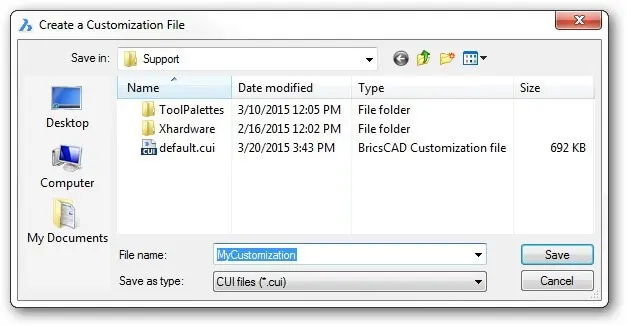
Naming the new CUI file
Back in the Customize dialog box, notice the new item called "MYCUSTOMIZATION." The same item appears in each tab controlled by the .cui file. Below, I show the new item in the Menu, Ribbon and Mouse tabs.

Left to right: MyCustomization item added to Menu, Ribbon and Mouse tabs
The other thing to notice is that the path to your new .cui file is listed down below in the parameters pane:

File parameter indicating path the to partial .cui file
Now, to actually use the partial CUI file for customization. Here are the steps for writing, for instance, a new menu:
a. In the Customization dialog box, click the Menus tab.
b. Scroll down to the MyCustomization section.
c. Right-click Main Menus.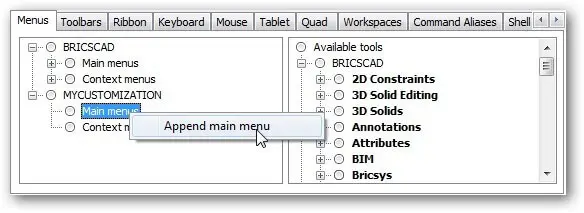
d. From the shortcut menu, choose Append Main Menu.
e. Carry on as described in the next post.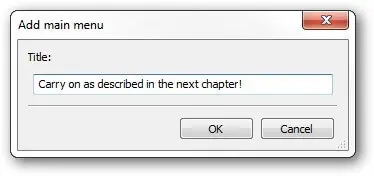
Naming the new menu
Sharing Customizations
By using partial customization files, you easily share customizations you make with others in your office, your clients and maybe even on the Bricsys eStore!
Follow these steps:
Go to the folder that holds your partial customization file. To locate the folder, click on the name of the partial item, then copy and paste the path from the File parameter:
a. Select all of the path by dragging the cursor across all of the text.
Selecting the text of the path
b. Use the Ctrl+C (Cmd+C on Macs) shortcut to copy the path to the clipboard. (You can try to right-click, but no shortcut menu will appear.)
c. In the File Manager, paste the text into the address bar (Windows shown here):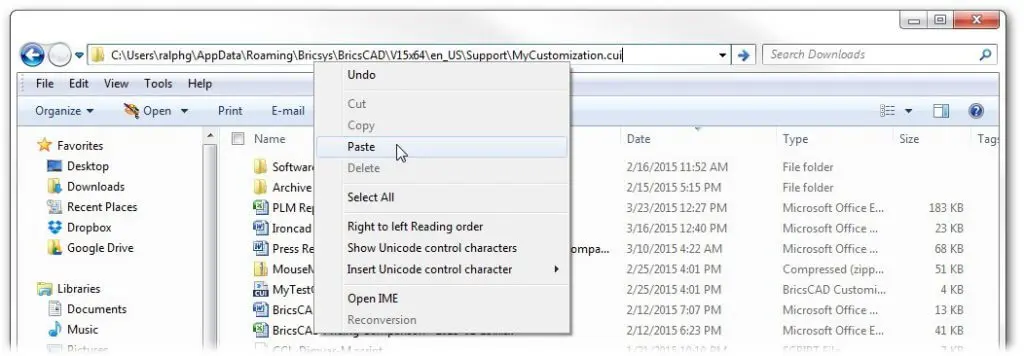
Pasting the path into the address bar
d. At this point, one of two things can happen:
- If you press Enter, then the .cui file will be opened by a text editor
- If you press Backspace to erase the file name from the path, then the file manager goes to the folder
For this tutorial, press Backspace to erase the file name, such as "MyCustomization.cui".

Erasing the file name from the path
e. Now press Enter. Notice that the file manager displays the contents of the folder.
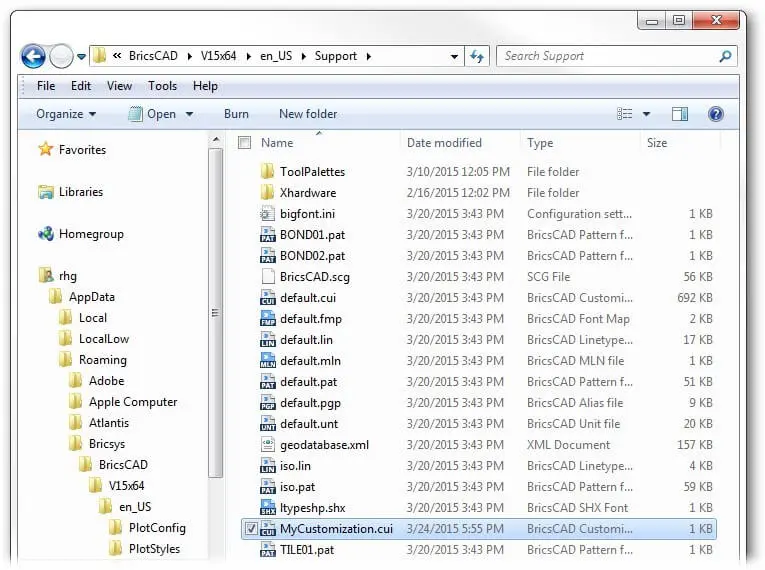
Files displayed in the support folder
You can now copy the partial .cui file to a USB drive or to a central file server like Dropbox or attach it to an email message
ORTo load a partial customization file, you can use the Customize dialog box's File | Load Partial CUI File option or you can use the MenuLoad command. Here are the steps to follow for the dialog box.
a. Enter the MenuLoad command.
b. Notice the Customization Group dialog box. Click the ... Browse button.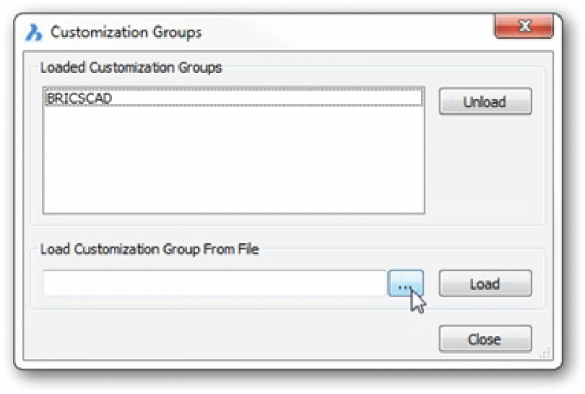
Clicking the Browse button in the Customization Groups dialog box
c. In the Choose a Customization File dialog box, navigate to the folder, drive, or network location that holds the .cui file you want.
d. Click Open.
e. Back in the Customization Groups dialog box, click Load.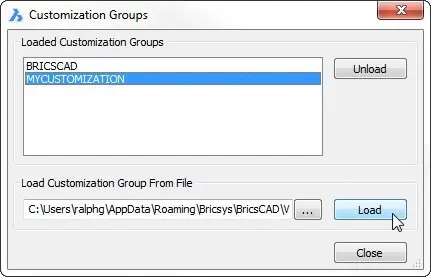
Loading the partial customization file into BricsCAD
f. Notice that the partial customization is added to the list of groups loaded into BricsCAD. Click Close to exit the dialog box.
The added customization should now appear in the BricsCAD user interface. If it contains menus, then the new menus will appear at the end of the menu bar. If ribbon tabs, then at the end of the ribbon. And so on.
Removing Partial CUI Files
You use this same dialog box to unload partial customizations that you no longer want in the CAD program. To do so, start the MenuLoad command, choose the Customization Group (such as "My Preferences") and then click Unload.
What's Next?
Join me next time when I explore ways to customize the Menu Bar and Context Menus.
Download BricsCAD free for 30-days
Start Using BricsCAD Today
Permanent or subscription licenses that work in all languages, in all regions.
- Introduction
- 55 Tips for BricsCAD Users
- Settings
- Changing the Environment
- Custom User Interface
- Introduction to the Customize Dialog Box
- Customize the Menu Bar & Context Menus
- Toolbars and Button Icons
- Writing Macros and Diesel Code
- Ribbon Tabs and Panels
- Keystroke Shortcuts, Aliases & Shell Commands
- Mouse, Double-click & Tablet Buttons
- Absolutely Everything You Need to Know About The Quad
- Rollover Properties
- Workspaces and the User Interface
- Designing Tool & Structure Panels
- Creating Simple & Complex Linetypes
- Patterning Hatches
- Decoding Shapes & Fonts
- Coding with Field Text
- Writing Scripts
- Programming with LISP (Introduction)
- LISP Functions

