
In this post, I will explain how to create custom keystroke shortcuts, aliases & shell commands.
Power users know that the keyboard is the fastest way to enter commands. BricsCAD has several ways to use the keyboard efficiently, among them keyboard shortcuts and aliases. These let you carry out commands by simply pressing assigned keyboard shortcuts and aliases.
The following topics are covered in this post:
- Understanding, editing, and deleting keyboard shortcuts
- Learning how keystrokes differ in Mac from Windows/Linux
- Listing all keystroke shortcuts
- Assigning multiple commands
- Learning about command aliases
- Editing and deleting aliases
- Applying alias rules
- Writing shell commands

These are the differences between keyboard shortcuts and aliases:
- Keystroke shortcuts are like ctrl+C, alt-tab, and ctrl+V that to copy objects to the Clipboard, switch to another application, and then paste them, respectively. You hold down the ctrl key, and then press C. BricsCAD has many other keyboard shortcuts for its commands, and it lets you create your own. Once you've memorized even a few, they let you work at top speed. The Keyboard tab assigns shortcuts to function keys, ctrl, alt, shift, and/or arrow key combinations.
- Aliases are abbreviations for command names, such as L for the Line command or AA for Area. So that you don't have to type full command names each time, you can create more aliases in the Customize dialog box's Aliases tab.
Out-of-the-box, BricsCAD defines the shortcut keystrokes listed in the boxed text on the previous pages. Regular keys (like A and 1) can be attached to the following special keys:
- Function keys --- those marked with the F prefix, such as F1 and F2
- Shift keys --- hold down the shift key, and then press a function, number, or alphabet key, such as F2 or B
- Alternate (Option) keys --- hold down the alt key, and then press another key; on Macs, hold down options key
- Control (Command) keys --- hold down the ctrl key, and press another key; on Macs, hold down cmd key
- Shift + Control keys --- hold down the shift and ctrl (or cmd) keys, and press another key
- Shift + Alternate keys --- hold down both the shift and alt (or opt) keys, and then press another key
- Control + Alternate keys --- hold down both the ctrl (or cmd) and alt (or opt) keys, and press another key
- Control + Alternate + Shift keys --- hold down the ctrl (or cmd) and alt (or opt) and shift keys all at the same time, and then press another key
TIP It does not matter if you press shift first or ctrl (cmd) first --- similarly for alt (opt).
You can add and change definitions by assigning commands to as many as 188 key combinations.
While Macs use Cmd/Options instead of the Ctrl/Alt used by Windows and Linux, the Customize dialog box displays Ctrl and Alt for all three operating systems. For instance, "Paste as Block" is shown as Ctrl+Alt+V in the Windows, Linux, and Mac versions of the Customize dialog box, but is used in the Mac version by pressing Command+Options+V.

Left: Keyboard shortcuts in Windows. Right: same shortcuts in Mac version of Customize dialog box
The Control key on Mac keyboards cannot be used with BricsCAD.
Here is a mapping table between the keys on the three operating systems:
| Windows/Linux | Mac Equivelent | Mac Symbol |
|---|---|---|
| Alt (Alternative) | Option |  |
| Ctrl (Control) | Cmd (Command) |  |
| … | Control |  |
| F (Function) | F (Function) | |
| Shift | Shift |  |
TUTORIAL: DEFINING SHORTCUT KEYS
In this tutorial, you assign the Fillet command to ctrl+shift+F. Here are the steps to defining this shortcut keystroke:
Enter the Customize (Alternatively, right-click any toolbar or ribbon and then choose Customize from the shortcut menu or enter the CUI alias.) Notice the Customize dialog box.
Choose the Keyboard Notice that it consists of three panes:
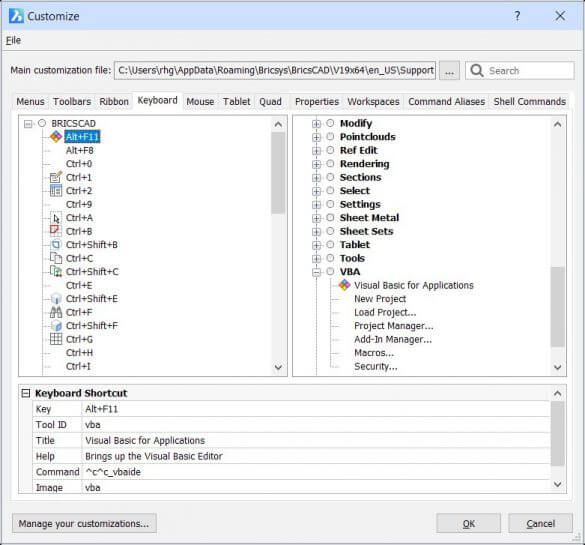
Right-clicking to access shortcut menu
- Shortcuts pane (at the left) --- lists the keyboard shortcuts that are currently assigned
- Available Tools pane (at the right) --- lists all of BricsCAD's commands, sorted by menu name
- Keyboard Shortcut pane (at the bottom) --- for editing shortcut settings
To define a new shortcut, right-click any item in the Shortcuts area, and then choose Insert Shortcut.

TIP Do not change keystrokes reserved by Windows, such as these ones:
- alt+f4 Exits BricsCAD
- ctrl+f4 Closes the current window
- ctrl+f6 Changes focus to the next window
- f1 Displays help
Notice that the Add Keyboard Shortcut dialog box appears, and that it offers these options
- Select available tool --- for choosing an existing tool (aka command) from BricsCAD's list
- Create a new tool --- for creating new tools (using macros) from scratch.

Dialog box for choosing the "tool" (command) to add to the shortcut keystroke
In this tutorial, you work with an existing tool, and in this case the "available tool" is the Fillet command. There is, unfortunately, no quick way to locate the command, as they are not listed alphabetically.
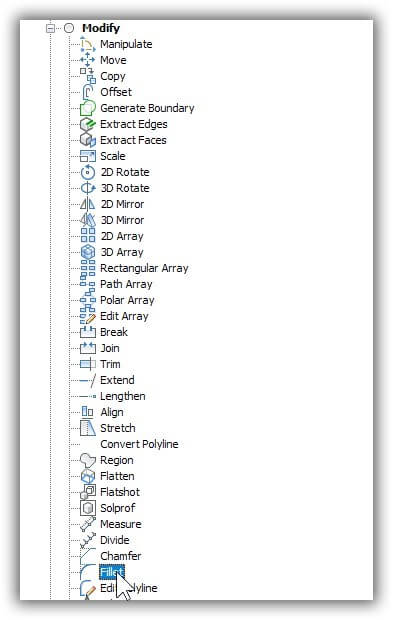
Arriving at the Fillet command
So, here is how to locate the command:
- Ensure the Select Available Tool option is.
- The Fillet command is a modification command, so you'll find it under Modify. In the list of Available Tools, open Modify by clicking the + sign next to it.
- Scroll down until you come across Fillet.

__TIP__ As a faster alternative, press the 'f' key on the keyboard. This causes the highlight to jump to Flatten. Keeping pressing 'f' until the cursor jumps to Fillet.
4. Click __OK__ to accept
Back in the Customize dialog box, notice that much of the data is filled in for you, such as the help string and command macro. The macro looks like this:
^c^c_fillet
Learn more about Macros
Fillet added, but not yet assigned a keystroke
All that is missing is the desired keystroke. You add it by pressing the desired keys on the keyboard, like this:Click the blank field next to Key.
Press the key combination on the keyboard, whether Windows, Linux, or Mac: CTRL+SHIFT+
- In Windows and Linux: Hold down the Ctrl and Shift keys, and then press F.
- In MacOS: Hold down the Cmd and Shift keys, and then press F.
Then let go of the three keys. Notice that the shortcut is added to the Shortcut list.
Pressing the keystrokes to assign to the tool
Click OK to dismiss the Customize dialog box and save your work.
Test the keystroke shortcut by holding down the ctrl (cmd on Macs) and shift keys, and then pressing F. BricsCAD should execute the Fillet command.
__TIP__ You can assign one or more keystroke shortcuts per command. But once a keystroke is assigned, it cannot be used for other commands.
TUTORIAL: EDITING & DELETING KEYBOARD SHORTCUTS
To edit or delete a keyboard shortcut, follow these steps:
Open the Customize dialog box with the Cui.
In the Keyboard tab, select a keystroke in the left hand column, such as the ctrl+shift+F you defined
In the Keyboard Shortcut area, edit the command. You can, for example, backspace over the command text, and then enter another macro
To remove a keyboard shortcut, right-click it, and then choose Delete Shortcut from the shortcut menu.
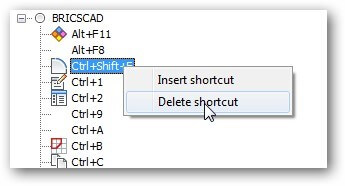
Deleting a shortcut definition
BricsCAD asks if you are sure; click Yes.
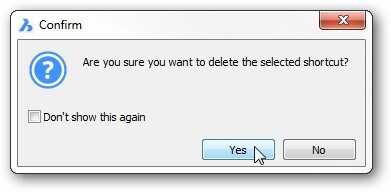
Getting one last chance before the definition is gone
Click OK to exit the dialog box.


Tutorial: How to Assign Multiple Commands
You can assign more than one command to keyboard shortcuts. When two or more commands are executed together, they are called macros. (Learn more about macros in part 9)
For example, to copy all objects in the drawing to the Clipboard takes two commands: Select All, followed by CopyClip. The macros for each are as follows:
Select All ^c^c_selgrips;_all;;
CopyClip ^c^c_copyclip
To combine these two commands into a single keystroke shortcut, Ctrl+Shift+A, follow these steps:
Insert a new keyboard sortcut.
In the Add Keyboard Shortcut dialog box, choose one command, such as Copy (CopyClip) found in the Edit section.
Click OK to return to the Customize dialog box.
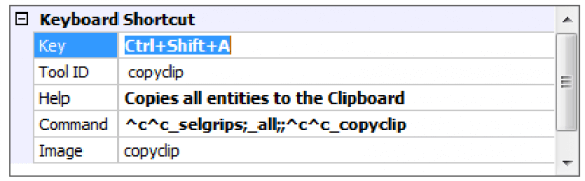
Add the other command, Select All, by editing the Command section of the Keyboard Shortcut area. Add the text shown in boldface:
^c^c_selgrips;
_all;;^c^c_copyclipThe semicolon ( ; ) is a metacharacter that's equivalent to pressing Enter.
Adding a shortcut keystroke to the macro
Add the shortcut keystroke to the Key field:
ctrl+shift+a
You may wish to update the Help string to something like, "Copies all entities to the Clipboard."
Click OK, and then test the macro by pressing ctrl+shift+A. BricsCAD reports:
:
_SELGRIPSSelect entities to display grips:
_ALLSelect entities to display grips:
:
_COPYCLIPTry pasting the copied objects into another document using ctrl+V.

Customizing Command Aliases
As well as keystroke shortcuts, BricsCAD also allows you to define one- or more-letter command shortcuts, called aliases. An alias typically is an abbreviation of a command name, such as L for the Line command, and OS for OSnap (object snap).
You may wonder about longer aliases, such as Color. Aliases can, in fact, be any length of characters, but when they are more than two or three characters in length, then they start to defeat the purpose of aliases, which is to be brief. Long alias names are, however, useful for making BricsCAD compatible with older versions with different command names, and with other CAD packages. For instance, Colour is another name for the Color command.
BricsCAD predefines around 300 aliases. There's a lot of them, because BricsCAD needs to have all of AutoCAD's aliases, plus more for BricsCAD commands that have changed names over previous releases.
With recent releases of BricsCAD, aliases are being deprecated. No new aliases are being added. This is because AutoComplete has taken over the task of entering a few letters to access an entire command name. In the figure below, I typed in l-a-y.

BricsCAD finding all commands that being with LAY
Instead of memorizing aliases (some of them obscure) that work for many --- but not all commands --- we now type the first one, two, or three letters of any command name to access all of them. Who would know that 'cui' is an alias for Customize; AutoComplete lets new users type 'cus' instead.
TIP Although they were designed to reduce keyboard typing, aliases can also be used in toolbar and menu macros. However, if the definition of the alias is changed, then the macro will no longer work.
TUTORIAL: CUSTOMIZING ALIASES
You access aliases, as follows:
Enter the Customize command. (Or, enter the Cui alias at the ':' command prompt.)
Notice the Customize dialog box. Click the Command Aliases tab.
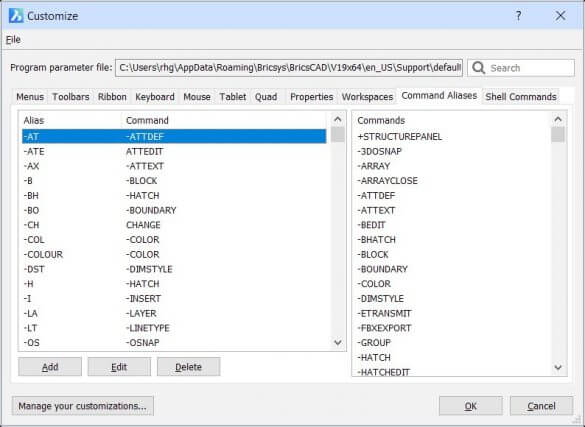
Customize dialog box showing the Command Aliases tab

This version of the dialog box looks different from other tabs, in that it has just two panes, plus some extra buttons along the bottom
Alias-Command pane (at the left) --- lists all aliases already defined. Notice that an alias, such as -AT is linked with the -AttDef command.
Commands pane (on the right) --- lists the names of all commands found in BricsCAD.
TIP Aliases are stored in the the default.pgp file.If you've created aliases with AutoCAD, you can import them into BricsCAD using Notepad to open the default.pgp file. Copy and paste aliases from AutoCAD's acad.pgp file.
Unlike keyboard shortcuts, aliases cannot be macros. This means each alias supports a single command only.
TUTORIAL: CREATING NEW ALIASES
In this tutorial, you create an alias for one of BricsCAD's commands lacking an alias: J for the Join command.
In the Customize dialog box's Command Aliases tab, click the Add button.

Adding an alias
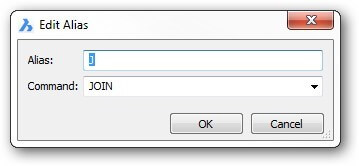
Notice the Add Alias text entry box:
In the Alias field, enter j.
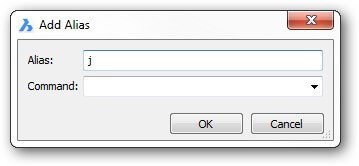
Specifying the new alias character
From the Command droplist, choose Join.
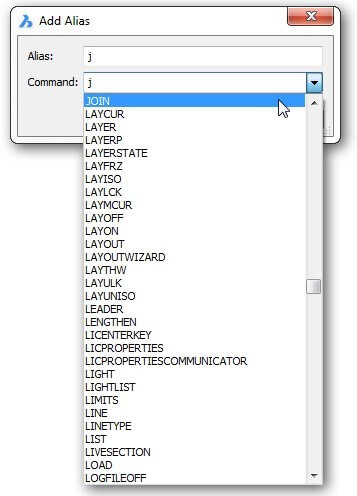
Choosing the command from a droplist
Click OK to dismiss the dialog box
Click OK to close the Customize dialog.
Now test the alias by entering J and then pressing Enter. BricsCAD should execute the Join command.


Tutorial: Editing & Deleting Aliases
To edit an alias, follow these steps:
In the Customize dialog box's Aliases tab, choose the alias you wish to edit, such as the J you defined above.
Click Edit. (To erase an alias, click Delete instead.)
Editing an alias
In the Edit Alias dialog box, select another command, and then click OK.
Click OK to exit the Customize dialog box.

BRICSCAD ALIASES SORTED BY COMMAND NAME
A
- align al
- aperture ap
- apparent planviewint
- arc a
- area aa
- array ar
- attdef at, ddattdef
- -attdef -at
- attdisp ad
- attedit -ate
- attext ax,
- ddattext -attext -ax
B
- background backgrounds
- base ba
- blipmode bm
- block b
- -block -b
- boundary bo, bpoly
- -boundary -bo
- break br
C
- centerline cl
- centermark cm
- chamfer cha
- change -ch
- circle c
- color col
- -color -col, -colour
- color colour, ddcolor, ddcolour, setcolor
- copy co, cp
- copylink cl
- customize cui
- cylinder cyl
D
- ddedit ed
- ddgrips gr
- ddselect se
- ddvpoint setvpoint, viewctl, vp
- dist di
- divide div
- donut do, doughnut
- draworder dr
- dsettings ddrmodes, rm
- dview dv
- dxfout dx
Dimensions
- dim dimension
- dimaligned dal, dimali
- dimangular dan, dimang
- dimbaseline dba, dimbase
- dimcenterdce
- dimcontinue dco, dimcont
- dimdiameter ddi, dimdia
- dimedit ded, dimed
- dimlinear dimhorizontal, dimlin, dimrotated, dimvertical, dli
- dimordinate dimord, dor
- dimoverride dimover, dov
- dimradius dimrad, dra
- dimstyle d, ddim, dimsty, ds, dst, expdimstyles, setdim
- -dimstyle -dst
- dimtedit dimted
E
- eattedit ate
- ellipse el
- erase delete, e
- expblocks bx, xb
- explode x
- export dwfout,
- exp expucs
- dducs, uc
- extend ex
- extrude ext
F
- fillet f, fi
G
- geographiclocation geo
- grid g
H
- hatch bh,
- h -hatch -bh, -h
- hatchedit he
- hide hi
I
- id idpoint
- image expimages, im
- imageadjust iad
- imageattach iat
- imageclip icl
- import imp
- insert ddinsert, i
- -insert -i
- insertaligned insal
- insertobj io
- interfere inf
- intersect in
- isolateobjects isolate
- isoplane is
L
- layer ddlmodes, explayers, la
- -layer -la
- layerstate las
- laymcur setlayer
- leader le, lead
- lengthen editlen, len
- light lighting
- lightlist ll line
- 3dline, l
- linetype ddltype, expltypes,
- lt -linetype
- -lt list li, ls
- ltscale lts
M
- matbrowseropen matb
- matchprop ma
- materialmap setuv
- materials finish, mat, rmat
- mirror mi mirror3d 3dmirror, 3m
- move m
- mslide msnapshot
- mspace ms
- mtext mt, t
- mview mv
N
- newwiz ddnew
O
- offset o
- oops undelete, unerase
- open op
- options cfg, config, preferences, prefs
- orthogonal or, ortho
- osnap ddesnap, ddosnap, os, setesnap
- -osnap esnap,-os
P
- pan p,
- -p pastespec pa
- pedit editpline, pe
- pline pl, polyline
- point po
- polygon pol
- preview ppreview, pre
- properties ch, ddchprop, ddmodify, mo, pr, props
- propertiesclose prc
- pspace ps
- purge pu -purge -pu
- pyramid pyr
Q
- qnew n
- qtext qt
- quit exit
R
- rectang rec, rect, rectangle
- redraw r
- redrawall ra
- regen re
- regenall rea
- region reg
- reinit ri
- rename ddrename, ren
- -rename -ren
- render rr
- renderenvironment fog
- renderpresets roptions
- renderwin rendscr
- revolve rev
- rotate ro
- rotate3d 3r, 3drotate
- rpref setrender
S
- save sa
- scale sc
- script scr
- section sec
- selgrips selgrip
- setucs dducsp, ucp
- setvar set
- shade sha
- shademode vscurrent
- sketch freehand
- slice sl
- snap sn
- solid plane, so
- spell sp
- spline spl
- splinedit spe
- stretch s
- style ddstyle, expfonts, expstyle, expstyles, st
- -style font
- subtract su
- sunproperties sun
T
- tablet ta -text -t
- text tx
- thickness th
- time ti
- tolerance tol
- torus tor trim tr
U
- union uni
- units ddunits, un
- -units -un
V
- vbaide vba
- view ddview, expviews, v
- -view -v
- vplayer vl
- vpoint viewpoint,
- -viewpoint,-vp,-vpoint
- vports viewports, vport, vw
- vslide vs, vsnapshot
W
- wblock w
- wcloseall closeall
- wedge we
- wmfin wi
- wmfout wo
X
- xattach xa
- xbind -xb
- xclip clip
- xline infline, xl
- xref expxrefs, xr
- -xref -xr
Z
- zoom z
- 3darray 3a, array3d
- 3dface 3f, face
- 3dmesh mesh
- 3dpoly 3p
RULES FOR WRITING ALIASES
Here are some suggestions Autodesk provides for creating command aliases:
- An alias should reduce a command to two characters at most.
- Commands with a control-key equivalent, status bar button, or function key do not require a command alias. Examples of commands to avoid include the New command (already assigned to ctrl+N), Snap (already on the status line), and Help (already assigned to function key F1.
- Try to assign the first character of a command. If it is already taken by another command, assign the first two, and so on. For example, C is assigned to the Circle command, while CO is assigned to the Copy
- For consistency, add suffixes for related aliases. For example, H is assigned to the Hatch command, so assign HE to HatchEdit.
Tutorial: Hand-Coding Aliases
If you wish to write your aliases directly, open the default.pgp file with a text editor. In Windows, open the file in Notepad (or Text Editor in Linux, or TextEdit in Mac). The .pgp file is found in the following locations:
Windows --- C:\Users<login>\AppData\Roaming\Bricsys\BricsCAD\V20x64\en_US\Support\default.pgp
sdA
Linux --- /home/login/Bricsys/BricsCAD/V20/en_US/Support
Mac --- /Users/login/Library/Preferences/Bricsys/BricsCAD/V20x64/en_US/Support
In all cases, the beginning of the file's Command Aliases section looks like this:
To add a new alias, mimic the format shown above:
alias, *commandName
Enter the alias name followed by comma, space, asterisk, and the command name.

Text editor showing the content of the Default.pgp file
When done, press Ctrl+S (or Cmd+S on Macs) to save the file. Back in BricsCAD, use the ReInit command to reload the .pgp file.
Customizing Shell Commands
The final tab in the Customize dialog box is labeled Shell Commands. It is meant for customizing shell commands, which are almost never used anymore.
They are a holdover from the days of DOS (disk-based operating system), from before Windows allowed multiple programs to run on PCs. The DOS operating system limited computers to running one program at a time. (Additional programs, called "TSRs" [short for terminate but stay resident], could be loaded into memory and accessed, but they had to be very small and be specially coded.)
If you wanted access a text editor or another useful program while running CAD, then you could "shell out" of the program, run the text editor, and then return to the CAD program. The CAD program suspended operations while the text editor was running. This was done with the Shell command, sometimes known as running an "external command."
Today, the Shell command is no longer necessary, because Windows lets us run many programs at the same time as we want, switching between them effortlessly. But Shell still works in BricsCAD and can be a handy way to access other software. For example, instead of starting a text editor by navigating through the Windows Start menu, you can type "notepad" at the BricsCAD command prompt:
: notepad
File to edit: (Enter a file name)
After you enter a file name, Windows launches Notepad with the file. When you enter the name of a file that does not exist, Notepad offers to start a new file with that name, as shown below.

Starting a new text file
To load a file at the same time as executing the external command, include the file name with the command name, like this:
Shell Command: start notepad default.pgp
When the name of the command and/or file have spaces in them, you'll need to use quotation marks around them, like this:
Shell Command: start notepad "c:\program files\bricsys\bricscad V20\default.pgp"
Quotation marks let the operating system differentiate between spaces that separate commands from spaces that are part of a file or path name.
Shell commands are stored in the same default.pgp file as aliases, and so is found in the following folder: *C:\Users<login>\AppData\Roaming\Bricsys\BricsCAD\V20x64\en_US/Support *.
The shell portion of file has not been adapted for use with Linux and Mac, because of shell commands' history stemming from DOS.
The Shell Commands section of the default.pgp file looks like this:

There are four components that define a shell command:
Alias --- specifies an alias for the shell command. It can be any word not already used by the default.pgp file.
Shell Command --- specifies the name of the command sent to the operating system. Notice that for Notepad there are two words, Start and Notepad:
Start is the command that executes another command, Notepad in this case. Leave out the ".exe" extension of the command name. If the shell command needs to also specify a file name, it is entered here, as I'll show you later
Prompt --- specifies the wording of a prompt to display in the command bar. This can be blank or consist of some helpful words, such as "File to edit."
In addition, there is a flags field at the end of each line. It is left blank, because BricsCAD does not support flags. If it ever did, here is what they would mean:
- On: BricsCAD does not wait for the application to finish before returning to the command prompt.
Off: BricsCAD waits for the application to finish. - On: The applications runs minimized; i.e., on the task bar.
Off: The application runs normally, ie, displayed on the screen. - On: The application does not appear.
Off: The application appears on the screen. - On: The shell command uses quotation marks; required when the name of the file contains spaces.
Off: The shell command does not use quotation marks.
TUTORIAL: EDITING SHELL COMMANDS
Shell commands are defined by the Shell Commands tab of the Customize dialog box. To see how they work, we'll look at one of the existing commands, Notepad. Follow these steps:
Enter the Customize
In the Customize dialog box, select the Shell Command tab. Notice that a few commands are already defined.
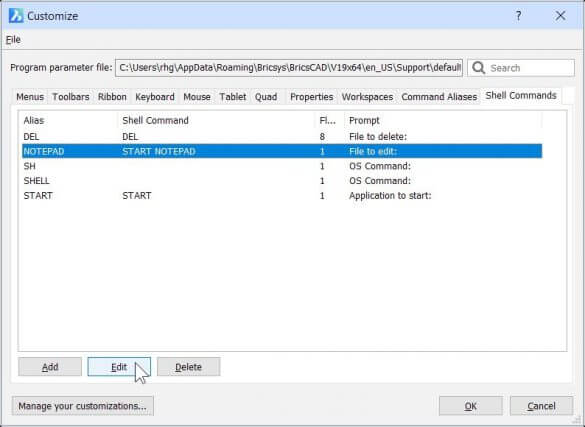
Adding a shell command
To edit a shell command, select one of them and click the Edit button. For this tutorial, select "Notepad," and then click Edit. Notice the Edit Shell Command dialog box.
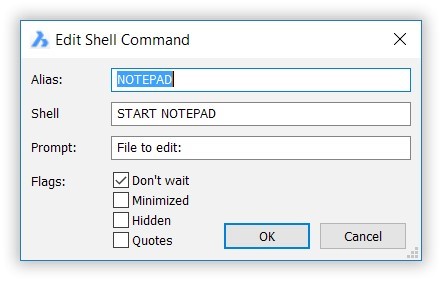
Editing a shell command
TIP It's not a good idea to use the names of existing BricsCAD commands or aliases; if you do, BricsCAD complains, "Cannot use the name for a shell command alias, because it already exist as a normal alias."
Make changes to the parameters, such as the alias or prompt.
Click OK to exit the dialog box and then click OK to exit the Customize dialog box.
Test the new customization.


The process for adding a new shell command is similar.
Download BricsCAD free for 30-days
Start Using BricsCAD Today
Permanent or subscription licenses that work in all languages, in all regions.
- Introduction
- 55 Tips for BricsCAD Users
- Settings
- Changing the Environment
- Custom User Interface
- Introduction to the Customize Dialog Box
- Customize the Menu Bar & Context Menus
- Toolbars and Button Icons
- Writing Macros and Diesel Code
- Ribbon Tabs and Panels
- Keystroke Shortcuts, Aliases & Shell Commands
- Mouse, Double-click & Tablet Buttons
- Absolutely Everything You Need to Know About The Quad
- Rollover Properties
- Workspaces and the User Interface
- Designing Tool & Structure Panels
- Creating Simple & Complex Linetypes
- Patterning Hatches
- Decoding Shapes & Fonts
- Coding with Field Text
- Writing Scripts
- Programming with LISP (Introduction)
- LISP Functions
Explore BricsCAD
Download BricsCAD Free Trial | Sign Up For News & Updates | Shop Online For BricsCAD Desktop Software

Ralph is the publisher of the weekly 'upFront.eZine' e-newsletter on the business of CAD and the 'WorldCAD Access' blog on technology. Author of 240+ books and ebooks about computer-aided design, and producer of 220+ videos on using CAD.
