
In this post, you learn about the BricsCAD® Quad, what does it, how you use it and how can you customize it in BricsCAD.
The trend in CAD user interface design is to move more of the action to the cursor, and so Bricsys® developed the Quad interface to do just that: it allows us to select commands very near to the cursor.
The Quad is somewhat customizable. BricsCAD uses workspaces to determine which groups of commands are displayed by the Quad, just as with the Ribbon. This means that commands specific to BricsCAD Mechanical appear in the Mechanical workspace, BricsCAD BIM commands in the BIM workspace, and so on.
The Quad also uses entity recognition to determine which commands are suitable at the moment, especially when it comes to editing. Select a 3D solid and solid editing commands appear.
The content of the Quad's interface is changed through the Customize dialog box, and that is the subject of this post.
The following topics are covered in this post:
- Understanding how the BricsCAD Quad works
Customizing the commands and groups displayed by the BricsCAD Quad
QUICK SUMMARY OF THE BRICSCAD QUAD VARIABLES
To turn the Quad cursor on and off, press the F12 function key; there is no "Quad" command. The following variables control the look of the Quad.
QuadAperture --- specifies the area to search around the cursor for entities, sized in pixels
QuadCommandLaunch --- determines if the Quad launches with the application
QuadCommandSort --- specifies the sort order of the commands
QuadDisplay --- toggles the display of the Quad cursor
QuadExpandDelay --- specifies the delay before expanding the Quad (in milliseconds)
QuadExpandTabDelay --- specifies the delay before expanding underlying buttons
QuadExpandGroup --- specifies how groups expand
QuadGoTransparent --- toggles whether the Quad goes transparent as the cursor moves away
QuadHideDelay --- specifies the delay to display the Quad following mouse movement (in msecs)
QuadHideMargin --- specifies the area in which the cursor keeps the Quad alive
QuadIconSize --- toggles the Quad between displaying small, large, or extra-large icons
QuadIconSpace --- specifies the spacing between icons
QuadMostRecentItems --- determines the number of most-recent items displayed on the Quad
QuadPopupCorner --- locates the Quad relative to the cursor
QuadPropertyUnits --- determines the automatic formatting of units when InsBase is not zero
QuadShowDelay --- specifies the Quad's display delay after an entity is highlighted
_QuadTabFlags --- determines the style of the Quad
TooltipDelay (new in v20) --- specifies the delay before tooltips appear (in msecs) in Quad, Ribbon, and Properties
QuadWidth --- specifies the width of the Quad, in columns
ON THE STATUS BAR
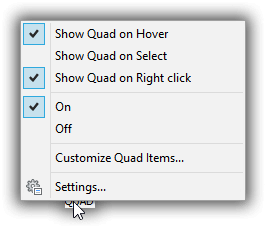
On the status bar, click QUAD to turn it on and off. Right-click the button to reveal this shortcut menu:

Show Quad on Hover --- QuadDisplay = 1
Show Quad on Select --- QuadDisplay = 2
Show Quad on Right-click --- QuadDisplay = 4
On/Off --- toggles display of Quad, like clicking QUAD on the status bar (QuadDisplay = -1)
Customize Quad Items --- displays the Workspaces tab of the Customize dialog box for changing the commands and groups displayed by the Quad.
Settings --- goes to the Quad section of the Settings dialog box
ABOUT THE QUAD
The Quad interface is unique to BricsCAD. It incorporates information about entities, along with drawing and editing functions into a rectangle that's right next to the cursor.

The Quad cursor, fully expanded
STEP 1: MOVE THE CURSOR ONTO AN ENTITY
Most of the time, the Quad is not visible; most of the time, you see the usual crosshair cursor. When, however, you pass the cursor over an entity, the entity highlights and the Quad appears as a single button. See the figure below. (If you do not see the Quad, then turn it on by clicking QUAD on the status bar or pressing the F12 function key.)

Initial appearance of the Quad
The initial button shows two things:
- Last-used Command --- on the left is the command (shown by the icon) that you last accessed on the Quad
- Rollover Tooltip --- to the right of the icon are several properties of the highlighted entity (if RT is turned on at the status bar)
Last-Used Command. The single button is the icon of the last-used command. By clicking it, you can quickly repeat the last command multiple times.
Rollover Tooltip. The name and the list of the entity's properties are together called a "Rollover Tooltip," because it appears when the cursor "rolls over" an entity. (If the Rollover Tooltip does not appear in the Quad, then click the RT button on the status bar to turn it on.)

By moving the cursor into the Rollover Tooltip, you can change the properties of the highlighted entity. Click on a property value, such as Color, to see a droplist of options.

Changing the properties of the highlighted entity
You can change the properties listed by the Quad on a property-by-property basis.
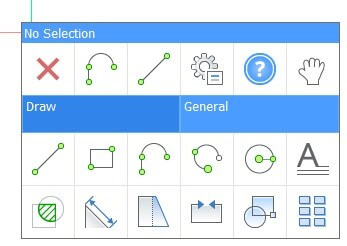
Step 2: Expand the Quad
As you move the arrow cursor into the last-command-used button, the Quad expands to show additional buttons. Usually, these are the commands that are commonly used with the highlighted entity. Click a button to execute its command.

Quad expanding when the cursor passes over it
Step 3: Move Into Groupings
Below the first row of commands is a row of blue boxes. These are headings and they hold groups of related commands. When you move the arrow cursor down into a blue box, such as Modify, more commands appear, in this case, related to modifying entities. Some groups of commands are for operations common to any entity, while others might be specific to the entity that is highlighted.

Quad expanding further when the cursor across the blue headings
The commands you see in the Quad vary according to the workspace.
Identifying Icons. To see the meaning of an icon, pause the cursor over a button and then read the description in the tooltip.

Viewing the meaning of a button
TUTORIAL: DRAWING WITH THE QUAD
The Quad can start up drawing commands, as well as editing ones. The process, however, is different from using the Quad for editing, because there is no existing entity over which to hover! To draw with the Quad, follow these steps:
Turn on the Show Quad on Right-click option by right-clicking the QUAD on the status bar and then selecting the option.
Turning on Quad's ability to draw entities
Right-click in the drawing area. Notice that the Quad appears with drawing commands.
Quad displaying drawing commands
Select one and then begin drawing the entity.


Tutorial: Dimensioning with the Quad
The Quad is especially handy for dimensioning entities quickly. The speed is due to two presets: dimensioning commands use the Entity option by default and the Quad knows which entity is selected.
To dimension an entity, follow these steps:
Pause the cursor over the entity.
Move the cursor into the Quad's Draw section.
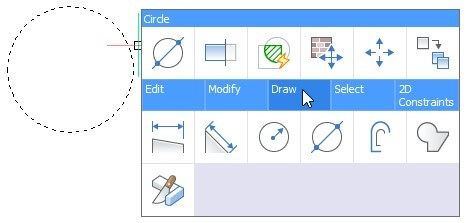
Selecting a dimensioning command from the Quad
Click a dimensioning command. Notice that it was dimensioned without you having to select the entity.
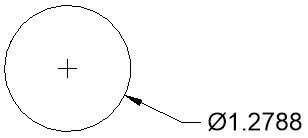
Entity is dimensioned


The same thing happens when dimensioning a line with two extension lines: all it takes is a single click.
MODIFYING THE QUAD'S BEHAVIOR
To make the Quad work differently from its default settings, take a look at the Quad section of the Settings dialog box. The fastest way to get there is to right-click QUAD on the status bar and then choose Settings in the shortcut menu.

Accessing Quad settings quickly
In the Settings dialog box, you can change the look of the Quad through the following variables:
- Display the Quad only when an entity is selected (QuadDisplay variable = 2)
- Have the Quad pop up at a different location (QuadPopUpCorner)
- Make the Quad icons larger or smaller, tighter or wider (QuadIconSize and QuadIconSpace)
- Control the appearance of rollover properties (RolloverTips and RollOverOpacity) See boxed text for the full list.
Customizing the Quad
The Quad has been under a great deal of development from when it was first introduced. It seems to get new functions with every release. For instance, the Quad Reactors section was added to BricsCAD V17. But in terms of customization, V17 removed the Quad tab from the Customize dialog box, and moved its content to the Workspace tab, under Quad Groups. But with V18 the Quad tab returned!
Until V18, all parts of the Quad were hard-coded, meaning we could not change them. Despite its presence in the Customize dialog box, the only customization available was whether (or not) to display predefined groups.
With V18, full customization became available:
- You can add and remove buttons from groups
- Create and destroy groups
- You cannot, however, edit the properties of existing buttons, such as the Title or Command fields
To customize the Quad, enter the Customize command and then choose the Quad tab. Alternatively, right-click the Quad itself (or right-click QUAD on the status bar), and then choose Customize Quad Items.

Accessing the Customize dialog box from the Quad
When you do, the Customize dialog box appears in the Quad tab. Notice that the Quad Button properties are grayed out, indicating that they cannot be edited by you.

Quad tab showing uneditable properties for buttons
Tutorial: Customizing the Quad Buttons
To add buttons to the Quad, follow these steps:
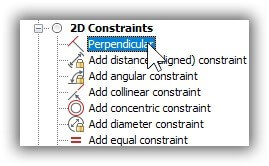
Right-click the name of a button and then choose Insert.

Right-clicking a Quad button
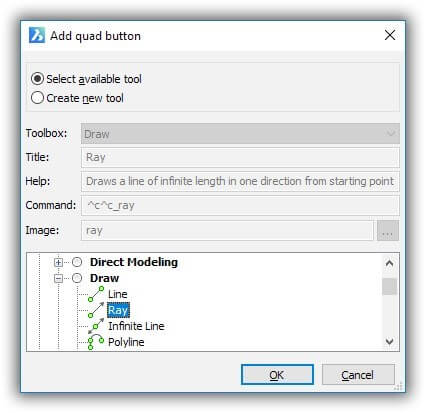
Notice the Add Quad Button dialog box. Choose a command (a.k.a. "tool") from the list, and then click OK.
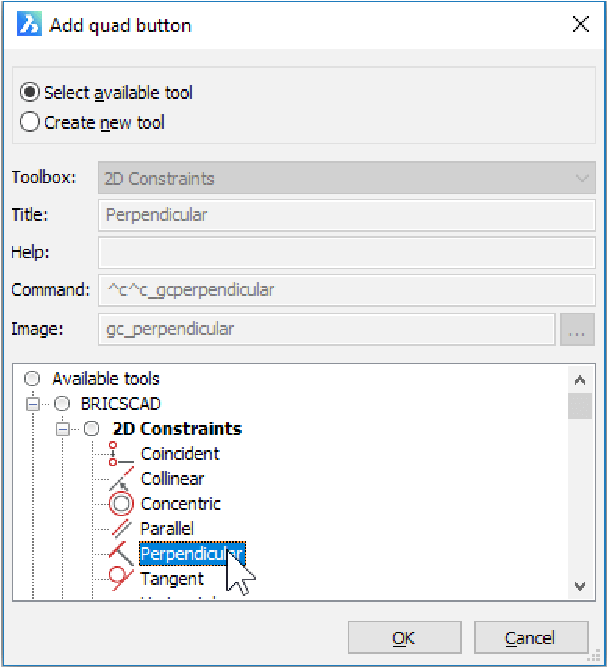
Dialog box for adding buttons to the Quad
Back in the Customize dialog box, the added tool appears above the one you selected.
Tool added to the Quad
Click OK to exit the Customize dialog box and then check the Quad to make sure the new button works.


To remove buttons from the Quad, follow these steps:
Right-click the name of a button, and then choose Delete.
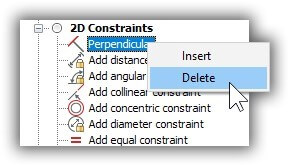
Choosing a Quad button to remove
Notice the warning dialog box:
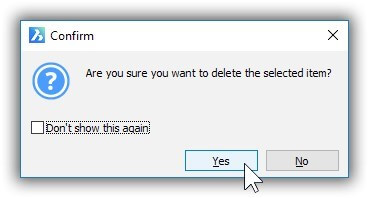
Agreeing to the question
Click Yes to finalize the removal.


CUSTOMIZING QUAD TABS
A tab is a group of buttons. Think of tabs as toolbars or Ribbon panels. Typically, similar commands inhabit a tab, such as for editing or constraints. The figure below shows tabs named Model, Draw, and so on.

Tabs in the Quad
To edit tabs in the Quad:
In the Customize dialog box's Quad tab, right-click the name of a tab. Notice the options available:

Right-clicking a Quad button
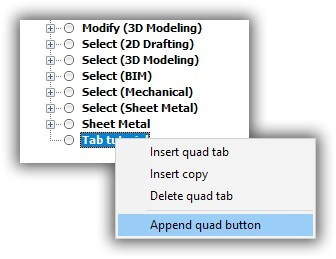
The options have the following meaning:
- Insert Quad Tab --- adds a new tab, empty of commands
- Insert Copy --- makes a copy of the selected tab, and then prompts for a new name
- Delete Quad Tab --- removes the tab from the Quad
- Append Quad Button --- adds a button to the current tab; see the previous tutorial
Tutorial: Adding Tabs
To add a tab to the Quad, follow these steps:
Right-click a tab name, and then choose Insert Quad Tab from the shortcut menu.
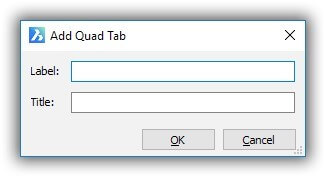
Notice the Add Quad Tab dialog box. Enter a label and a title.
Naming the new tab
For this tutorial, enter the following:
Label New Tab
Title Tab tutorialClick OK to dismiss the dialog box. Back in the Customize dialog box, notice that the new tab name is added above the one you selected.
New tab added to the list
The tab is unpopulated, so add a button by following these steps:
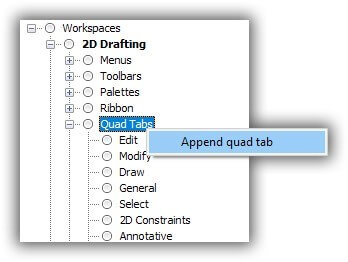
Right-click the new tab, and then select Append Quad Button.
Adding a button to the new tab
Notice the Add Quad Button dialog box. For this tutorial, choose a drawing command, such as Draw > Ray.
Click OK to close the dialog box. Back in the Customize dialog box, notice that the new tab sports the new button.


At this point in the tutorial, we pause.
Where's My New Tab?
You might think that the new tab will now appear in the Quad, like a new menu or a new ribbon panel --- but not so fast. Probably, it won't. That's because the appearance of a tab depends on how the workspace is set up.
Is the tab part of a workspace? The appearance of tabs is controlled by the workspace, as described next.
Tutorial: Turning On Quad Groups (Tabs)
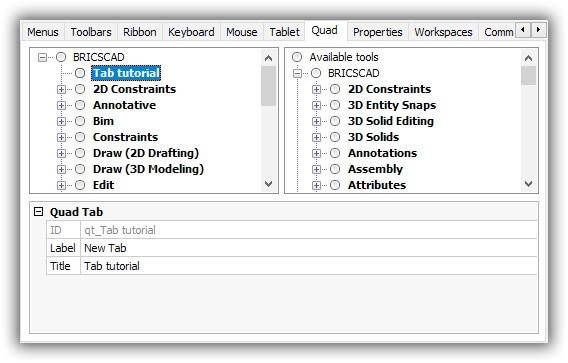
The Workspace tab of the Customize dialog box specifies which Quad tabs are allowed to be displayed. (Quad tabs used to be called "groups.") No tab is seen until its name is added to the Quad Tabs section of a specific workspace. If you want the tab in every workspace, then you have to add it over again to each one.
In the Customize dialog box, click the Workspace
Open the Drafting workspace by clicking the + (node) next to it.
Quad Tabs section of the Workspaces tab
Open the Quad Tabs section. Notice that the new tab you created is not listed. Similarly, when you scroll through the Available Tools listing, it is not there, either.
Getting ready to append a tab
Right-click Quad Tabs and then choose Append Quad Tab from the shortcut menu.
Notice the Select Quad Tab dialog box, which lists the names of tabs you can add to the workspace. The tabs are listed in alphabetical order by their labels (such as "Tab tutorial"), rather than by their titles (such as "New Tab") because labels are more descriptive.
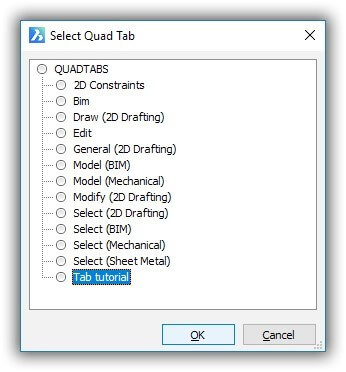
Selecting the tab to add
Select "Tab tutorial" and then click OK.
Notice that the tab is added to the workspace, under the name "New Tab."

"New Tab" added to the 2D Drafting workspace
Let's see if the new tab appears in the Quad. Click OK to close the Customize dialog box.
In the BricsCAD drawing area, right-click to display the Quad in drawing mode. Move the cursor to display the tabs and then the content of the "New Tab" tab.
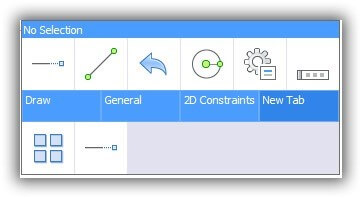
New Tab successfully added to the Quad


Toggling Quad Tabs
You have to add a tab to the Quad Tabs section to make it appear in the Quad. But you don't need to remove it to hide it. Instead, change the value of its Display parameter, as shown in the figure below:

Toggling the visibility of a Quad tab
When you remove a tab from the Quad Tabs section in the Workspace tab...

Deleting a Quad Tab from a workspace
...BricsCAD asks if you are sure:

Confirming the deletion
However, if you are removing the last reference of a Quad tab in all workspaces, then there is an extra layer of safety:

A workaround is to create a dummy workspace and store your custom Quad tabs in it.
ABOUT QUAD ENTITY FILTERS
Entity filters are what BricsCAD uses to determine which commands to display. An entity filter is a piece of programming code that reacts to (filters) the entity found under the cursor. For example, when the selected object is text, then the Quad shows commands specific to text --- in addition to the All Entities section.
(Entity filters were named "Quad Reactors" in BricsCAD V17, and before V17 were known as "Custom." In those releases, reactors could only be toggled on or off. Even today, in one shortcut menu they are called "Custom Alias," and in one dialog box, they are called "Entity Alias." )
You can customize filters for the Quad commands (buttons) that you create. Quad items that are built by Bricsys cannot be changed, and so are shown in gray, as illustrated below.

Filters cannot be edited for pre-made Quad buttons
Tutorial: Changing Entity Filters
To specify the entities that your custom Quad button should recognize, follow these steps:
In the Quad tab of the Customize dialog box, select a command in your custom Quad Tab. For this tutorial, the Quad Tab is named "Tab tutorial.
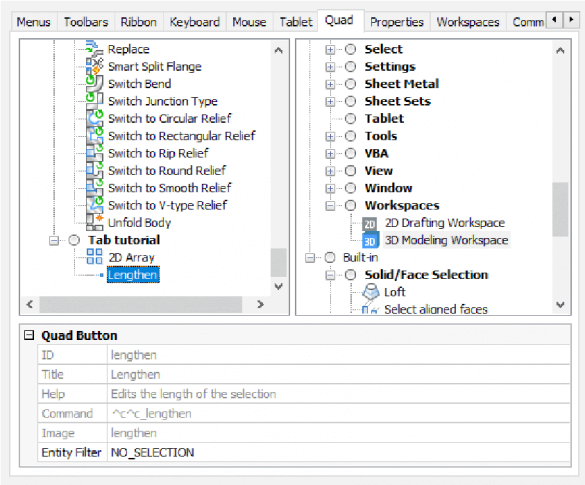
Select a Quad Button item
Look down to the Quad Button pane. Notice that you cannot change any property, except Entity Filter. (The other properties are grayed out.)
Select Entity Filter, and then click the Browse button (found at the right end of the field).
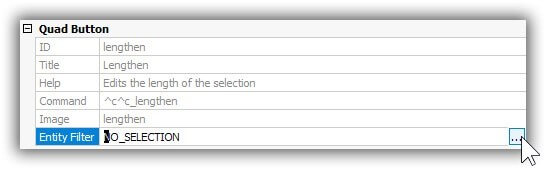
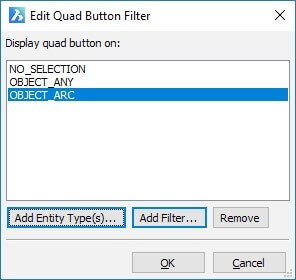
Notice the Edit Quad Button Filter dialog box, and that it lists the generic "No_Selection" filter.
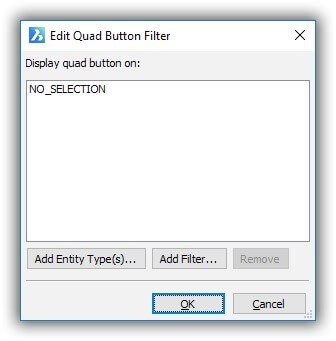
Current state of custom filterYou can add a generic filter for all entities and/or add specific entities to be filtered.
To add a generic filter, click the Add Filter button.
Notice that the new dialog box also sports the title, Add Quad Button Filter.
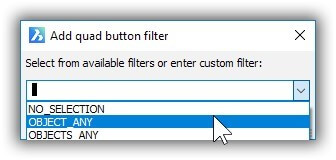
Choice of filters
The content of this dialog box is not documented, so I am only guessing at what the options mean:
Ojects_Any For common editing commands, such as Move and Erase. (This filter was formerly named ALL_ENTITIES.)Object_Any For entity-specific editing commands, such as PLine and AttEditNo_Selection For drawing commands, where no entity is selected initially. (This filter was formerly named NO_SELECTION.)
You can also type in the name of your own "custom filter," which I think is meant for third-party developers
Click OK to close the dialog box. Notice that your selection is added to the list.
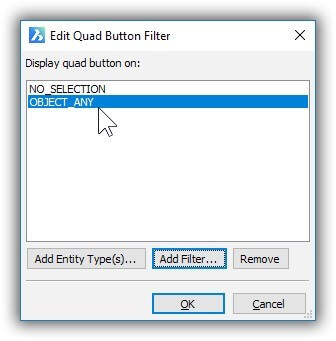
Filter added to the list
Now click the Add Entity Type(s) button. Notice the Add Entity Alias dialog box
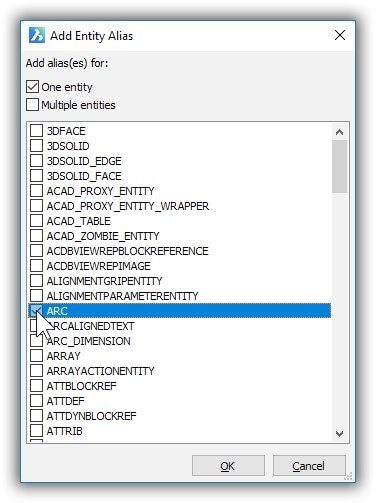
Choosing an entity
Choose one or more entities to which your Quad button should react, such as Arc.
Click OK. Notice that again the item is added to the filter list.
Arcs added to the filter list
To remove a filter from the list, select it and then click the Remove button. Remove the No_Selection and Object_Any filters, leaving the Object_Arc filter.
Click OK to close the Edit Quad Button Filter dialog box, and then click OK to close the Customize dialog box.
Test the change you make to the button's property by drawing a line and an arc. Your custom Quad tab appears when you pause the cursor over the arc, but not over the line.


Left: New Tab tab appearing for an arc; right: ...but not for the line
How the Quad Works. Or, How Does It Know What Entity Is There?
Pieter Clarysse of Bricsys explains: "The cursor makes use of C++ reactors to determine which entities are nearby. The icons that appear are appropriate to the entity.
"For example, if the cursor is near an intersection, it will display the Chamfer and Fillet commands. When the cursor is over a gap between two entities, it will have the Trim and Extend commands; the size of the gap (aperture) it recognizes can be adjusted in the Settings dialog box."
To select the entity that is under the cursor in macros, use the ^S metacharacter, which is unique to BricsCAD. It is unique because ^S selects the entity without you needing to pick it. This allows for actions like dimensioning entities with a single pick: the pick consists of selecting the dimensioning command from the Quad.
Download BricsCAD free for 30-days
Start Using BricsCAD Today
Permanent or subscription licenses that work in all languages, and all regions.
- Introduction
- 55 Tips for BricsCAD Users
- Settings
- Changing the Environment
- Custom User Interface
- Introduction to the Customize Dialog Box
- Customize the Menu Bar & Context Menus
- Toolbars and Button Icons
- Writing Macros and Diesel Code
- Ribbon Tabs and Panels
- Keystroke Shortcuts, Aliases & Shell Commands
- Mouse, Double-click & Tablet Buttons
- Absolutely Everything You Need to Know About The Quad
- Rollover Properties
- Workspaces and the User Interface
- Designing Tool & Structure Panels
- Creating Simple & Complex Linetypes
- Patterning Hatches
- Decoding Shapes & Fonts
- Coding with Field Text
- Writing Scripts
- Programming with LISP (Introduction)
- LISP Functions

Ralph is the publisher of the weekly 'upFront.eZine' e-newsletter on the business of CAD and the 'WorldCAD Access' blog on technology. Author of 240+ books and ebooks about computer-aided design, and producer of 220+ videos on using CAD.
