In this post, you learn how to customize the menu bar and its context menus. You make changes to menus via the Customize dialog box.
Menus arrange commands in logical groups. The menu uses words primarily. The logical arrangement and use of words makes it easy to find specific commands, more so than any other interface, especially for new users and for commands that we rarely use.
This post will cover:
- Modifying menu items
- Adding new menu items
- Adding new tools (commands)
- Creating context menus
- Sharing menus
- Importing menus from AutoCAD
MODIFYING THE MENU BAR
BricsCAD lists nearly all of its commands on the menu, organizing them by categories. For instance, the Draw menu is where you find most drawing commands; most file commands in the File menu.
Sometimes, however, you may want to change the content of menus or add a menu --- something that is common for third-party developers particularly.
In addition, you may wan to add and remove parts of menus, without affecting the original menu structure. These parts of menus are known as partial menus. For example, Bricsys adds "Parametric" as a partial menu to the Platinum edition of the software. It appears as another word on the menu bar.
Technical Note The items shown in the Customize dialog box reflect the contents of default.cui and other customization files. As you make changes in the dialog box, BricsCAD records the changes in the appropriate .cui or .pgp file, and then adjusts the looks and actions in the user interface of BricsCAD.
QUICK SUMMARY OF MENU COMMANDS & VARIABLES
The following commands work with menus:
Menu --- loads menu files into the program; supports the following file formats:
- CUI Standard menu file used by AutoCAD since release 2007, and BricsCAD since V8
- CUIX Packaged menu files used by AutoCAD since release 2010
- MNU Legacy menu files used by AutoCAD and AutoCAD LT prior to release 2008
- MNS LISP source code used by MNU files
- ICM IntelliCAD menu file used by BricsCAD V7 and earlier
MenuLoad --- loads menu groups
MenuUnload --- unloads menu groups
The following variables work with menus:
- MenuBar --- toggles the display of the menu bar
- MenuName --- reports the path and name of the current menu file
Touring the Menu Tab
Menu customization takes place in the Customize dialog box. Enter the Customize command or Cui alias at the ':' command prompt, or else right-click any toolbar and then select Customize.
Notice the Customize dialog box. If necessary, click the Menus tab.

Customize dialog box showing the Menus tab
On the left side you see the Main Menus pane. The names, such as File, Edit, and through to Help, represent the default menus available in BricsCAD. You can change nearly all of them, naturally.
To see the menus actually displayed by BricsCAD at this moment, however, you need to switch to the Workspace tab, because the purpose of the Menus tab is to define menus; the Workspaces tab determines which menus are seen on the menu bar:
- Click the Workspaces tab.
- Under the Drafting node, open the Menus node, and there is the list of active menu items.

Workspaces tab showing the menus of the Drafting workspace
It matches what you see on the menu bar, in the same order. Shown here is the menu bar from the "Drafting" workspace. The menu bar will probably change when you switch to another workspace.

Menu bar for Drafting workspace
QUICK SUMMARY OF MENU PARAMETERS
The look of every menu item is defined by parameters found in the Customize dialog box's Menus tab. The position of menus, submenus, menu items, and separators is defined by their position in the dialog box. Here is the meaning of the parameters:
Title --- label that appears in the menu. The text is displayed literally, but other characters and metacharacters can be employed:
- ... (ellipsis) means the command opens a dialog box
- & (metacharacter) underlines the character following; used for keyboard shortcuts in conjunction with the Alt key
Diesel --- code written in Diesel programming code
Tool ID --- identifier assigned to the menu item by BricsCAD; do not adjust this ID
Help ---sentence of text displayed on the status bar when you pause the cursor over the menu item
Command --- macro to be executed when you click the button; the macro can consist of command names or aliases, option words, Diesel, and LISP code
Image --- name of the bitmap (a.k.a. picture or icon) displayed to the left of the menu item; the image is changed by clicking the ... button that appears when this parameter is selected.
Opening and Closing Nodes
Notice that each menu title has a next to it. For instance, click next to File to reveal the items in the File dropdown menu. The items under File match the names you see in the File menu, as illustrated below.

Left: File menu tree displayed by the Customize dialog box; right: Identical menu items in the File menu.
Gray Dots and Separator Lines
Notice that there are gray dots that prefix items in the dialog box. These dots indicate "container" items, menu items which literally contain other items. Here are examples:
BRICSCAD is the name of the menu group. It contains Main Menus (the items seen on the menu bar) and Context Menus (the shortcut menus that appear when you right-click objects.)
Main Menus contains the items that appear on the menu bar.
File is the name of the first menu to appear along the menu bar, and it contains file-related commands.
The rows of dashes "-----" indicates a separator bar, the gray line that separates groups of menu items. See figure above.
UNDERSTANDING MENU TITLE CONVENTIONS
Menu names employ special characters to define conventions. To see what they mean, choose the New command and then look at the bottom part of the dialog box --- the Menu Item pane.

Menu Item pane showing parameter fields
The Title field contains the word "New" along with several characters, which I highlighted below in boldface:
& New...
Let's take a look at the meaning.
Keyboard Shortcut -- &
The ampersand ( & ) is placed in front of the keyboard shortcut letter --- N in this case (&N). This causes the letter N to be shown underlined in the menu when you press the Alt key.
Keyboard shortcut letters allow you to access the menu without a mouse, just from the keyboard. To do so, you hold down the Alt key and then choose the underlined letters in the menus. For example, to access the New command in the menu, follow these steps:
Press the Alt Notice each menu name on the menu bar has one letter underlined, such as File.

Underlined letters on menu bar
To access the File menu, press F on the keyboard (for File). Notice now that items in the menu also have underlined names, such as New and New Wizard.
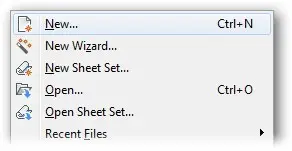
Underlined letters in File menu
To access the New command, press N on the keyboard (for New).
The convention is that the first letter should be underlined for mnemonic purposes. For example, New, Open, and Save each have the first letter underlined.
When two names in a menu start with the same letter, however, then the second name has to have a different letter underlined. For example, New has N underlined, and so New Wizard is given Z.
Dialog Box -- ...
The ellipsis ( ... ) indicates that the command opens a dialog box. Note that New... displays a dialog box, whereas Save does not. By itself, the ellipsis does nothing; it is merely a user interface convention. This means that it's your job to add the ellipsis when you know a command will open that dialog box.
Menu Titles
The name of a menu item can be the same as the command it operates --- or it can be different. In most cases, the menu title should be the same as the command it carries out. For instance, selecting the New... item causes BricsCAD to executes the New command.
When the command name is somewhat cryptic, however, then it makes sense to switch to a descriptive title, such as using "Polyline" for the PLine command.
COMMANDS USE MACROS
Macros are the programming code behind menu picks. As I noted above, choosing File | New executes the New command. In the Customize dialog box's Menu Item pane, the command is shown as ^c^c_new in the Command field.

Macro being shown in the Command field
TIPS You can type commands, options and metacharacters directly into the Command text box. As an alternative, you can select commands from the Available Tools pane and then click Insert Tool. The advantage to this alternative approach is that BricsCAD automatically adds the ^C and _ metacharacters for you.
Like titles, macros make use of metacharacters. The macro syntax has the following meaning:
Cancel -- ^c
The ^c metacharacter means "cancel." The caret ( ^ ) is the equivalent of the Ctrl key; together with C, ^c is the same as pressing the Esc key to cancel a command. The convention is to start (almost) every macro with two ^c so that nested commands are cancelled.
Transparent -- '
You do not prefix macros with ^c if the command is to be operated transparently, such as '_Redraw. The apostrophe metacharacter ( ' ) means the command can be used during another command.
Not all BricsCAD commands are transparent.
Internationalize -- _
The underscore ( _ ) "internationalizes" the command. BricsCAD is available in a variety of (human) languages. By prefixing commands with the underscore, the command word is understood, even if it is used by the Spanish or German releases of BricsCAD.
The PromptOptionTranslateKeywords variable toggles the use of international commands. When off, the underscore ( _ ) prefix is not needed for command input; default = on.
Enter -- ;
The semicolon ( ; ) is equivalent to pressing the Enter key. For example, the macro for the View | Zoom | Zoom In menu item looks like this:
'_zoom;2x
In this macro, the Zoom command accesses its 2x option to zoom into the drawing. You typically use the semicolon to separate commands from options.
The convention is to not include a semicolon at the end of the macro, because BricsCAD automatically adds the Enter for you. If, however, the macro needs to end with two or more Enters, then you do need to supply the two or three semi-colons, such as ;; and ;;;.
Pause --
The backslash ( \ ) pauses the macro for user input, so that you can pick a point or select an entity. In the macro below, BricsCAD pauses twice, once for each backslash. (I show commands and options in blue, while pauses for user input are in purple.)
^c^c_dimlinear;\\_rotated
This is how the DimLinear command appears in the command bar:
: dimlinear
ENTER to select entity/<Origin of first extension line>: (User picks first point.)
Origin of second extension line: (User picks second point.)
Angle/Text/Orientation of dimension line: Horizontal/Vertical/Rotated: _ROTATED Angle of dimension line <0>: (And so on.) Here is how the macro works:
- The ^c^c sequence cancels any existing command.
- The DimLinear command begins.
- The backslash metacharacter forces the macro to wait for input from the user, such as one of these:
- The user picks a point on the screen
- The user enters a value at the keyboard and then presses Enter
- The second backslash forces the macro to wait at the 'Origin of second extension line' prompt for the user to react.
- The macro executes the Rotated
EDITING THE HELP STRING
When you change the purpose of a menu item, then you may need to change the text of the help string as well. The help string is displayed on the status bar when the user selects the menu item.

Help text displayed on the status bar
You edit the text in the Help String textbox.

Help text specified in the Customize dialog box
Tutorial: Adding Menu Items
You can add new items to menus by right-clicking an existing menu item in the Customize dialog box, and then choosing an option from the shortcut menu. The shortcut menu allows you to create new menus, add commands and sub-menus to existing menus, and add separator bars.
In this tutorial, you add the CloseAll command to the File menu; it will be located after the Close item. The CloseAll command closes all open drawings.
With the Cui alias, open the Customize dialog box, and then choose the Menus
In the Main Menus pane, open the File item.
Find the Close Below it is a ----- (separator) item.
Right-click the separator to place the new item before it. Notice that BricsCAD displays a shortcut menu.
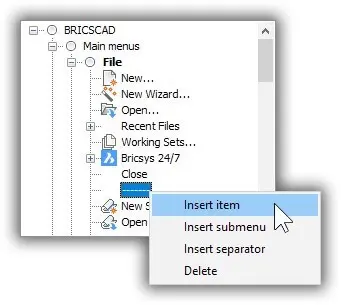
Adding an item to the menu by inserting it
To add a new menu item above the currently-selected one, choose Insert Item. Notice the Add Menu Item dialog box.This dialog box lists all commands available in BricsCAD --- just like that Available Tools pane. (I'm not sure why there's that duplication.) The dialog box lets you select existing commands and create new ones.
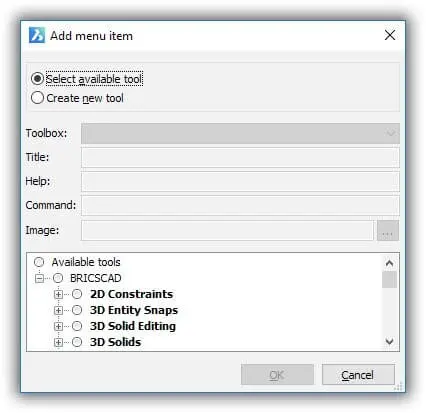
Add New Item dialog box
Historical Note Earlier releases of BricsCAD had an Append Item option, which added the new item to the end of the menu structure. It didn't make much sense, and was subsequently removed.
In the dialog box, choose the Select Available Tool option. It lets you pick one of BricsCAD's built-in commands. (The other option, Create New Tool, is for creating new commands, and is described later.)

Choosing Select Available Tool option
Under the list of Available Tools, open the File container, and then choose Close All.
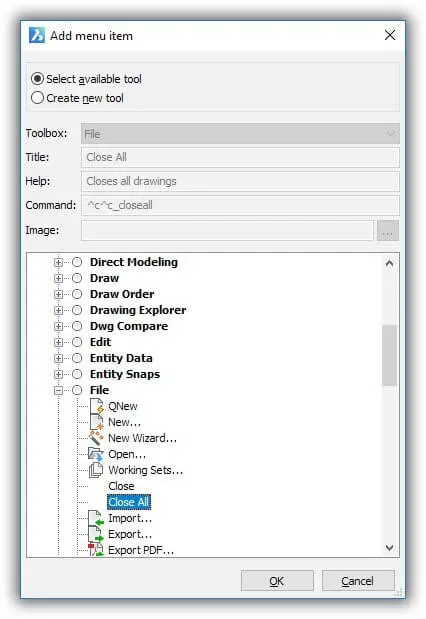
Choosing 'Close All' from the File section
At the top of the dialog box, notice that BricsCAD has filled in most of the parameters for you, such as Title, Help, and so on. They are, however, grayed out; if you wish to edit these values, you need to wait until you are back in the Customize dialog box.
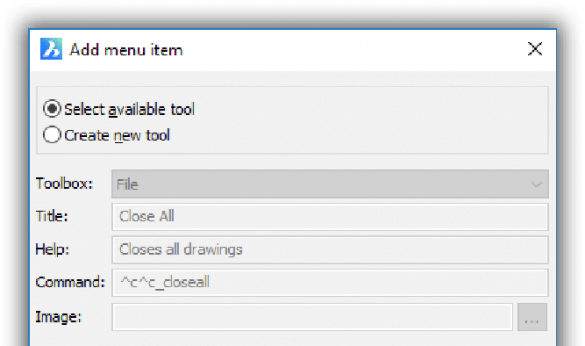
Grayed-out parameters
Click OK. Notice that the Close All command is added to the list under Close.
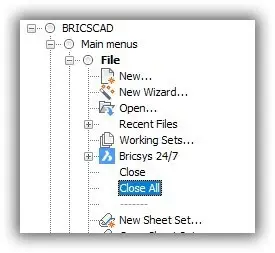
Close All command added to the File menu
To ensure the new command works, follow these steps: a. Close the Customize dialog box by clicking OK. b. Choose the File menu. Notice that the Close All item has been added.
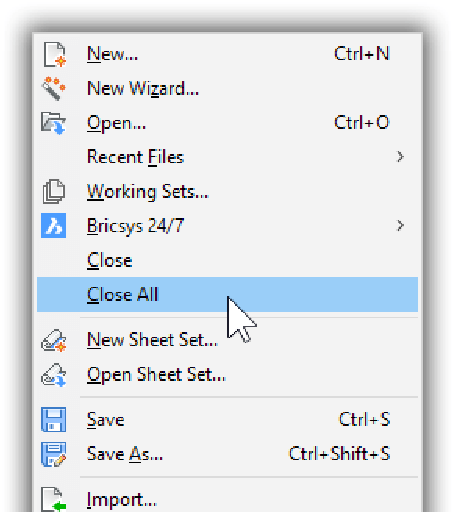
Close All command appearing in the File menu
c. Click Close All. Does it work correctly? It should prompt you to save all open drawings that have changed since being loaded.
TIP Not sure which commands can be added to menus? Peruse the list in the Customize dialog box found under Available Tools. It lists all commands found in BricsCAD, sorted by menu order.
The Available Tools listing also allows you to add your own commands, which can be constructed from other commands or from LISP routines.
TUTORIAL: DELETING MENU ITEMS
To delete a menu item, select it, and then right-click. You can delete individual menu items, as well as submenus and entire menus.
From the shortcut menu, choose Delete.
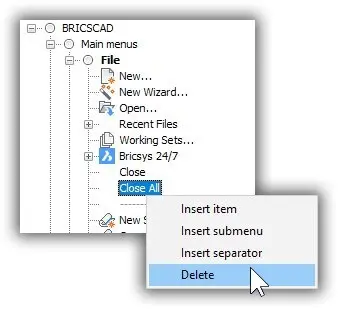
Choosing Delete from the shortcut menu 2
BricsCAD asks if you really want to do this. Click Yes.

Confirming the item should be erased
Did you make a horrible mistake? There is no undo button. Instead, click the Revert to Defaults button to return the menus to their fresh-out-of-the-box nature. This action, however, also undoes all other changes you made, including those you may want to keep.

Revert to Defaults button in the Customize dialog box
Tutorial: Adding Tools to Menus
So far, you've seen how to add existing BricsCAD commands to menus and toolbars. You also make "new" commands, which BricsCAD calls tools. These are not so much commands as reworkings of existing commands --- pieces of simple programming code that simulate commands --- and are known as "macros." These are described in detail in the following post.
To show you how to create new tools, I'll write a macro that saves the drawing and then starts the Plot command. So, two commands combined into a single menu pick. The macro looks like this:
^C^C___qsave;_plot__
I'll name the macro "Save'n Print" and add it to the File menu, like this:
In the Customize dialog box's Menu tab, follow these steps:
a. Choose the File
b. Right-click Print.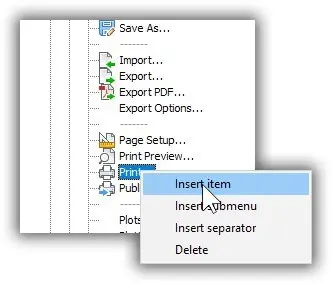
Inserting an item
c. From the shortcut menu, choose Insert Item.
Notice the Add New Item dialog. Select the Create New Tool option.

Creating a new tool (aka a new command)
Fill in parameters, as follows:
| Parameter | Entry | Comment |
|---|---|---|
| Toolbox | File | Adds the new command to the File category of available tools |
| Title | Save’n Print | Name that appears in the File menu |
| Help | Saves the drawing, and then starts the Plot command. | Help text that appears on the status bar |
| Command | ^C^C_qsave;_plot |
Macro that cancels the current command, saves the drawing, and then starts the Plot command |
| Image | (leave blank) | No images are needed for menus |
When the parameters are filled in, the dialog box looks like this:

Parameters filled out for the new tool
Ignore the bottom half of the dialog box, the one that lists all commands.
Click OK. Back in the Customize dialog box, notice that the new tool is added to the File menu (on the left) and to the list of Available Tools (on the right)
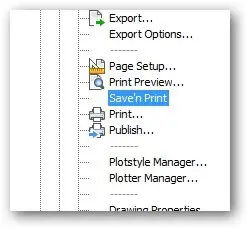
New tool added to the menu
In addition, the new set of parameters is shown in the Menu Item pane (at the bottom of the dialog box.) You can edit the parameters here, just like with any other command.
Click OK.
Test the new item by selecting Save'n Print from the File menu.
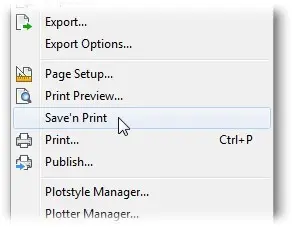
Testing the new tool
Context Menus
Context menus go by a number of names, such as "shortcut menu" or "right-click menu." Whatever the name, they are the menus that appear when you press the mouse's right button --- the action known as "right-clicking."

Left: Mouse highlighting right button. Right: Example of a context menu
Different shortcut menus appear depending on where you right-click in BricsCAD: while drawing or while editing or in the user interface.
As well, the menu that appears depends on whether you hold down the Shift and/or Ctrl keys at the same time as right-clicking. The Menu tab's Context Menu section defines the menus; the Buttons tab defines some other right-click actions. (See future posts).
You can customize the content of some context menus, though not all of them. Specifically
- You can customize those that appear when you right-click inside the drawing area
- You cannot change the menus that appear when you right-click outside of the drawing area, such as on the status bar or a toolbar
TIP If shortcut menus do not appear when you right-click the mouse, then you need to turn on several related options in the Settings dialog box, like this:
- Enter the Settings
- In the Search field, enter "shortcut menus."
- Turn on all options, as illustrated below

TUTORIAL: CUSTOMIZING CONTEXT MENUS
Context menus are customized in the much same way as regular menus.
Open the Customize dialog box (Tools | Customize) and then choose the Menus
In the left-hand pane, scroll down until you reach Context Menus.
Click the + to open the Context Menus tree. Notice the menus represented there, as illustrated below.
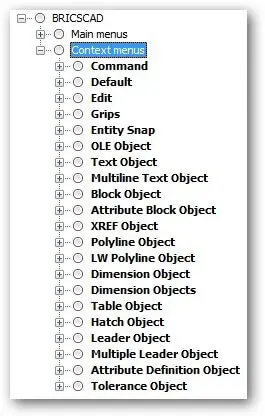
Accessing the list of context menus in the Customize dialog box
Below is the context menu that is displayed when you select a text object, and then right-click. Commands specific to text editing are added by BricsCAD, which I have emphasized in blue.
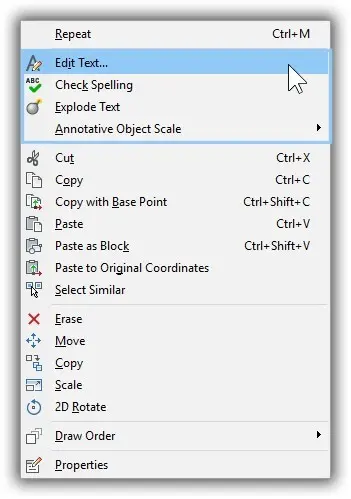
Context menu when a text object is selected
There are two types of context menus, full and partial:
Full menus --- replace existing context menus, and all other items defined by the Customize dialog box.
Partial menus --- add items to context menus, such as editing text, polylines, dimensions, and attributes.
Full Context Menus
- Command A command is active
- Default No command is active
- Edit Object is selected, other than those listed below
- Grips A hot (red) grip is active
- Entity Snap The Shift key is held down
Partial Context Menus
- OLE Object OLE object is selected
- Text Object Text object is selected
- Multiline Text Object Multi-line text object is selected
- Block Object Block is selected (formerly named "Insert")
- Attribute Block Object Attributed is selected (formerly "Attribute Block Reference")
- XREF Object Externally-referenced drawing is selected
- Polyline Object Old-style polyline is selected
- LW Polyline Object New-style lightweight polyline is selected
- Dimension Object Dimension is selected
- Dimension Objects One or more dimensions are selected
- Table Object Table is selected
- Hatch Object Hatch pattern is selected
- Multiple Leader Object Multi-line leader is selected
- Attribution Definition Object Attribute definition is selected
- Tolerance Object Tolerance is selected
The structure of the context menu's definition is similar to that of regular menus. For instance, items are listed in the order in which they appear, and there are submenus and separator lines.
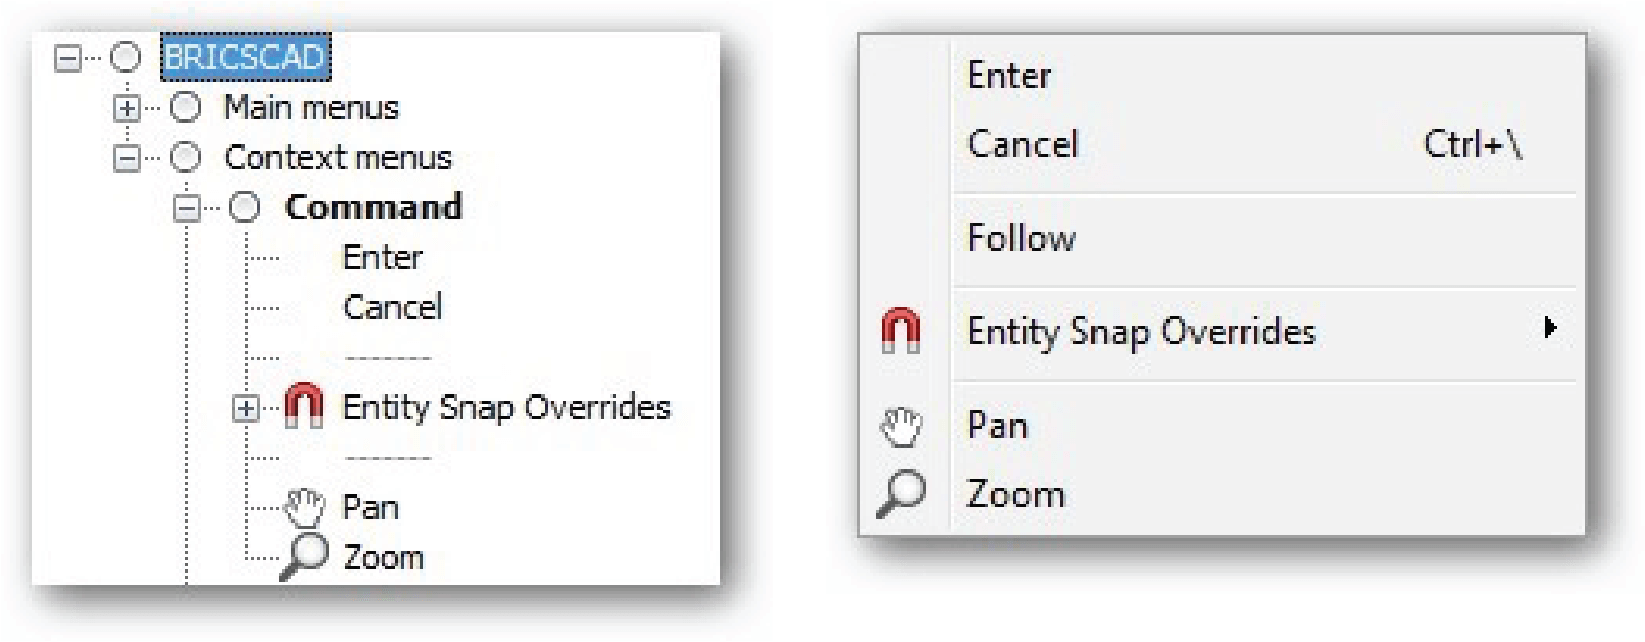
Left: Context menus in Customize dialog box. Right: Context menu appears when right-clicking during an active command
Adding commands is no different than before. Follow the previous two tutorials on adding existing commands and new tools to context menus.
There is one thing different in creating new context menus: they are activated only when you right-click something specific. BricsCAD has a list of these specific actions, also known as "reactors." Right-click Context Menus.
From the shortcut menu that appears, choose Append Context Menu.
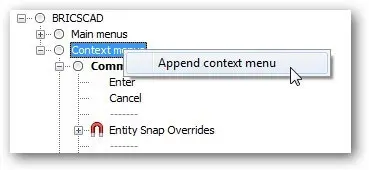
Appending a context menu
The Add Context Menu dialog box options are split into two streams.
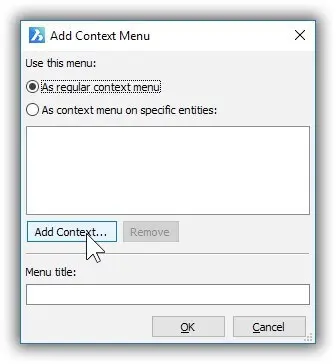
Add Context Menu dialog box
The Use This Menu options are as follows:
As Regular Context Menu --- this option accesses context menus that don't involve entities, such as during commands or right-clicked grips. There are just five of them. To choose one of them, click the Add Context The Add Context Alias dialog box appears, as shown below.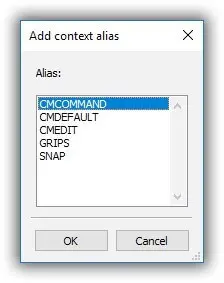
Selection of non-entity shortcut menus
As Context Menu on Specific Entities --- this option accesses context menus for entities, such as text and polylines. Click the Add Entity Type(s) button to select one from the Add Entity Alias dialog box.
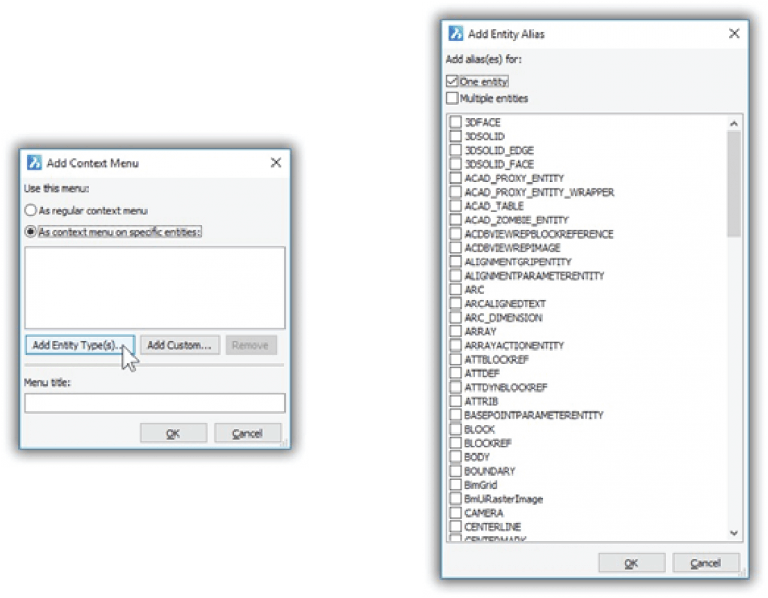
Selection of shortcut menus specific to entities.
For this tutorial, you create add a shortcut menu that involves viewport objects. Follow these steps:
a. Choose As Context Menu on Specific Entities.
b. Click Entity Type(s). Notice the Add Entity Alias dialog box.
c. Scroll down the list, and then choose Viewport. To get there quickly, press 'v'.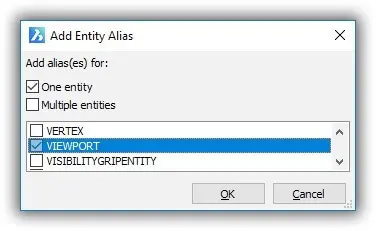
Selecting the Viewport as the entity
d. Click OK to close the dialog box. Notice that "Object_Viewport" is added to the list of entities.
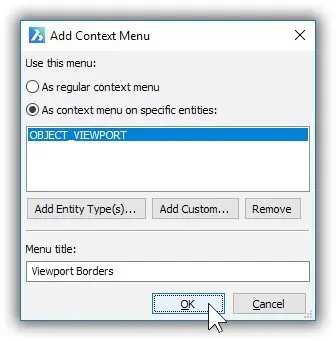
Viewport added as the specific entity
e. Add text to the Menu Title, such as "Viewport Borders"...
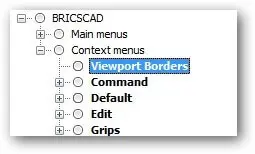
Naming the menu
... and then click OK. Notice that BricsCAD adds the new menu to the list. It is, however, empty of commands.
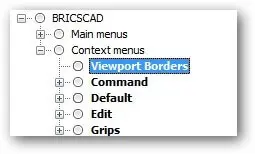
Viewport Borders item with no commands
Your job now is to populate the context menu with commands. Follow the instructions given earlier for regular menus. When done, click OK, and then test the new shortcut (context) menu.
TIP The Custom Alias option is meant for third-party developers who create custom objects:
Tutorial: Sharing Menus
To share customized menus with other BricsCAD users, follow these steps:
Open the Customize dialog box (Customize), and then from the File menu, choose Save Main CUI File As.
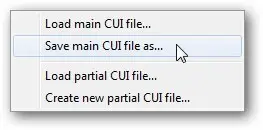
Saving the menu as a CUI file
In the dialog box, enter a file name, and then click Save. BricsCAD saves the menu structure as a .cui This action saves menus, toolbars, and so on in the same .cui file. It does not save aliases or shell commands, because they are stored in a .pgp file, which you cannot access from the Customize dialog box.
Copy the .cui file to the other computers via your network, email, or a USB
On the other computer, import the .cui file through the Customize dialog box's File
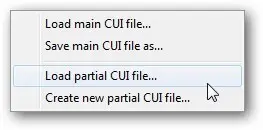
Loading the CUI file as a partial menu
The menu presents you with two options:
- Load Main CUI File --- overwrites existing menus, toolbars, and keyboard shortcuts with the new file. (If you did not mean to, use the Revert to Defaults button to correct the mistake.)
- Load Partial CUI File --- adds the contents of the file to the existing menus, toolbars, and so on.
IMPORTING AUTOCAD MENUS
The Customize dialog box's File | Load items import three kinds of menu files into BricsCAD. Choose them from the droplist in the Choose a Customization File dialog box:
CUI --- standard menu file used by AutoCAD since release 2007, and BricsCAD since V8.
CUIX --- packaged menu files used by AutoCAD since release 2010
MNU or MNS --- legacy menu files used by AutoCAD and AutoCAD LT prior to release 2008.
ICM --- IntelliCAD menu file used by BricsCAD V7 and earlier, as well as CAD systems based on IntelliCAD.
Careful: Although BricsCAD imports AutoCAD menu files effortlessly, menu picks sometimes do not work because AutoCAD macros can contain macro code and metacharacters unsupported by BricsCAD. For more information on writing macros for menus, see my later posts.
Download BricsCAD free for 30-days
Start Using BricsCAD Today
Permanent or subscription licenses that work in all languages, in all regions.
- Introduction
- 55 Tips for BricsCAD Users
- Settings
- Changing the Environment
- Custom User Interface
- Introduction to the Customize Dialog Box
- Customize the Menu Bar & Context Menus
- Toolbars and Button Icons
- Writing Macros and Diesel Code
- Ribbon Tabs and Panels
- Keystroke Shortcuts, Aliases & Shell Commands
- Mouse, Double-click & Tablet Buttons
- Absolutely Everything You Need to Know About The Quad
- Rollover Properties
- Workspaces and the User Interface
- Designing Tool & Structure Panels
- Creating Simple & Complex Linetypes
- Patterning Hatches
- Decoding Shapes & Fonts
- Coding with Field Text
- Writing Scripts
- Programming with LISP (Introduction)
- LISP Functions
Explore BricsCAD
Download BricsCAD Free Trial | Sign Up For News & Updates | Shop Online For BricsCAD Desktop Software

