In our last post, we outlined an approach for training users to make the transition from another CAD system to BricsCAD. In that post we stressed using familiar contexts, like a project that has been completed previously, to isolate training content to just the software differences by removing as many variables as possible.
In this post, we’ll assume that the first phase of training has been completed and that users are becoming familiar with the overall look and feel of BricsCAD. Now we’ll pivot to demonstrating some key differences, new features, and strategies you can use to make users more at home yet aware of cool new features in BricsCAD that can boost their productivity. Let’s see how.
Use a Little More LISP
Some commands in BricsCAD function very much like commands in other programs but don’t use the same command name. Here are a few examples to get the conversation started:
ORBIT. AutoCAD® users are used to a command called ORBIT which is very much like BricsCAD’s RTROT command. As soon as you show an AutoCAD® user the 3DROT command they will feel right at home.
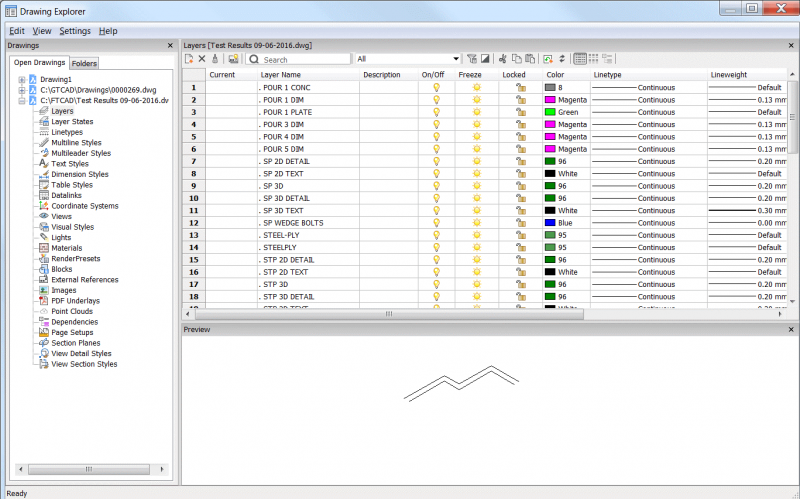
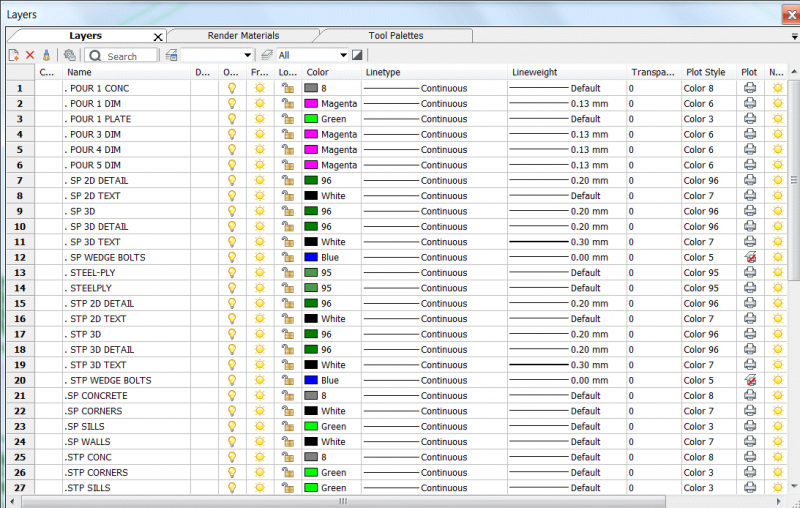
LAYER. AutoCAD® users expect the LAYER command to bring up a floating (modeless) palette that can be left open while working. In BricsCAD the default implementation of LAYER brings up the Drawing Explorer command set to the Layers tab (see Figure 1) but this is a modal that does not allow the user to keep working. Enter the BricsCAD LAYERSPANELOPEN command which looks just like an AutoCAD® user would expect (see Figure 2) – so our challenge is to substitute the LAYERSPANELOPEN command for the LAYER command and AutoCAD® users will again feel right at home.
 Figure 1 – The EXPLORER command has several applications in BricsCAD – including layer management.
Now go back to our blog post on LISP Concepts for Easy Migration and you’ll see how we placed code in the STANDARDS.LSP file to create an ORBIT and LAYER command that cater to AutoCAD® user’s expectations.
 Figure 2 – The LAYERSPANELOPEN command works in a modeless (floating) fashion very much like AutoCAD®’s LAYER dialog.
Let’s expand this logic a bit more by considering Alias functions.
Replicate Alias Commands
Users who’ve used AutoCAD® for a long time typically know not just the command they want to use (like LINE or ERASE), but they often use an alias shortcut to access them (like L or E, respectively). Replicating those aliases can also be a great way to make AutoCAD® users feel at home in BricsCAD.
Here are a few alias functions that I’ve had users ask about in training:
| ADC. | This is short for Design Center which BricsCAD emulates with the EXPLORER command. We could easily add this code to our STANDARDS.LSP file to get the same result:(defun C:ADC () |
| BE. | This is short for Block Editor which BricsCAD handles with the REFEDIT command. We could easily add this code to our STANDARDS.LSP file to get the same result: (defun C:BE () |
Edit the software to fit the user rather than train the user to learn new software.
The idea here is that rather than teaching AutoCAD® users what a similar command in BricsCAD is, you can just make the keystrokes the AutoCAD® users already know launch into the right command and bypass training altogether. My general rule is to edit the software to fit the user rather than train the user to learn new software, and replicating command aliases is a great way to follow this rule.
BricsCAD® Only Commands
When migrating to BricsCAD it is, of course, our first task to make users comfortable, but we must also be sure to point out commands BricsCAD has those other CAD systems don’t. Here are a few that I’ve used which new BricsCAD users seem to really enjoy:
| BLOCKIFY | Automatic recognition of repetitive sets of geometry will be recognized and “Blockified” for easy subsequent editing. Think about opening a drawing of a building where all the door blocks had been exploded and what a pain it would be to deal with that mess? BLOCKIFY can clean up messes like that in seconds and compress DWG file sizes substantially while doing so. |
| QPRINT | Rapid print output using the default devices and settings associated with a drawing/layout, with no trip to the Publish command required. |
| System variables. A wide variety of system variables (SYSVAR’s) that control default parameters for PDF files can be saved in template files, thus saving a trip to the PageSetup command. |
Spice Up Training with a Few New Commands
As you take users through the training process you can throw in a new command every so often in a context that makes sense. Here are a few examples you could use:
| When you’re ready to print | Mention that the QPRINT command could save keystrokes and time and illustrate the use of it after the users have mastered basic print/plot functions. |
| When editing layers | Take time to show the users how the EXPLORER command gives them access to all the editable parameters in their drawing – not just layers. Most users I’ve trained say, “Oh, that’s different but I really like having everything on one screen!” |
| When taking a break | Show the users an example of BLOCKIFY just so they see the capabilities. While they may not deal with a bunch of exploded blocks every day, they will save tons of time using BLOCKIFY when they do. |
Again, these are only a few suggestions. The main point is to introduce new features gradually rather than overwhelming users with a bunch of new commands at the start. I’ve found that once users see what is available, they’ll start digging into BricsCAD’s command vocabulary independently and find applications I’d never thought of demonstrating.
Summing Up
I hope this 5-part series on how to manage the migration to BricsCAD has illustrated how you can use system tools, LISP, and well-designed training to make the process easier for both you and your users. In future articles, we’ll continue to look at more features that CAD managers can leverage to make BricsCAD productive as well as digging into customization and programming topics.
Ready to try BricsCAD?
Easy to try, easy to buy, easy to own. That’s BricsCAD. Try all of our products, for free for 30 days at www.bricsys.com. Freedom of choice, plus perpetual (permanent) product licenses that work with all languages, in all places. You’ll love what we’ve built for you with the BricsCAD V21 product family.

