In our last CAD Managers Corner post we talked about taking inventory of your current CAD ecosystem so you can be prepared to migrate to BricsCAD. In this post we’ll examine the next step of preparing for implementation – getting your network and file sets deployed and tested. Let’s see how.
First: Where will the BricsCAD Ecosystem Live
By “live” I mean where will all the files reside? I’m going to assume you have multiple users and will thus want to utilize network storage for all of BricsCAD’s programs, customization, printers, plotters and software drivers in a single location. This network approach is highlight recommended for the following reasons:
Single source of truth. Never again will you have to install the same set of files on multiple machines because the only files your users need is on the network.
- Ease of modification. Need to edit a program? Just change it in one place. Need to swap out a plotter? Just edit the plotter configuration file on the network to point to the new device.
- Ease of debugging. Never again do you have to debug a similar problem multiple times because you fix the problem once at the network location.
You will, however, want to create a unique storage path on your network so you can configure BricsCAD without impacting any other CAD tools. That will allow for the old system to run unaffected while you perform testing and development on your new BricsCAD installation.
Software Customization: Take Inventory
If you have customized programs (LSP), template files (DWT), block libraries (DWG), menus (CUI), tool palettes (XTP) or other components that your users are already familiar with you’ll want to bring them over to BricsCAD as well. Think about how you’d like the files to be organized into folders – probably much like you did with the old system – and start copying the files you’ll need from the old locations to the new BricsCAD location.
A few key points to note in this approach:
- Change if structures if needed. Have you always wished you could change the organizational structure of your custom files? If so, now is the time to do it.
- But watch your step! Some resources that are called from menu files or palettes can expect the target file to be in a specific path. If this is the case, you may need to stick to the original path or make some edits.
- UNC or mapped drives? Get with your IT department and ask them whether a pathing approach based on UNC (\server\share) or a mapped drive (Drive Letter = share) will be easiest for them to keep constant. Nothing is worse than having IT change a mapped drive letter or UNC resource location after you’ve created all your customization. It really is worth a few moments to ask this question now, so you won’t be sorry later.
- Set correct permissions now. These new folders containing BricsCAD custom files should be created with permissions that allow users to read and use the files/folders in question but not edit or delete them. The time to get good permissions control of your BricsCAD ecosystem is right at the start. Bonus: And by testing your new system with the correct permissions you’ll find any problems BEFORE going into production.
Because BricsCAD supports most industry standard custom content chances are excellent that you’ll be able to migrate your custom tools. So, take a little time to think how you want it setup because the decisions you make now will be with you for the lifetime of your BricsCAD ecosystem.
Network: Tell BricsCAD where to look
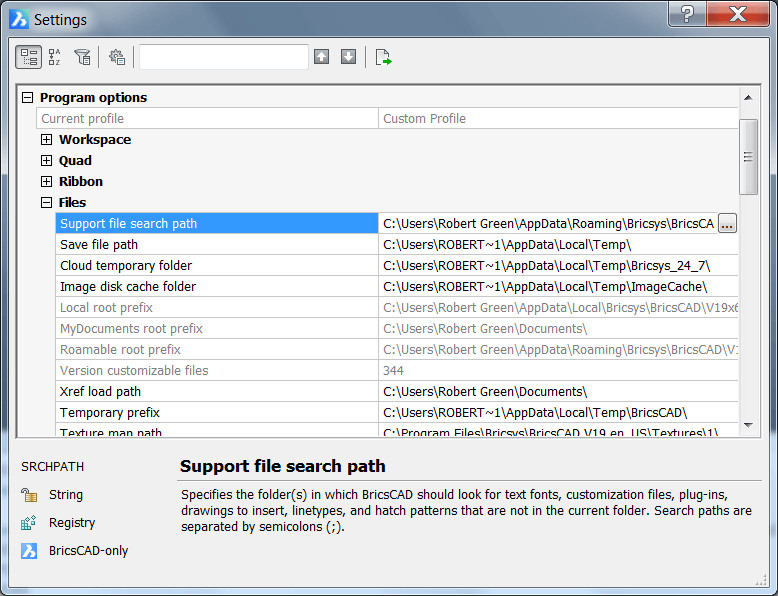
BricsCAD – like any CAD program – is constantly accessing a variety of files to do its job and it is likely that most of those files are coming from a network location. In the BricsCAD SETTINGS command you can set all the various pathing locations for support files, XRef paths, plotter locations, etc. and then test to be sure it all works.
 Network file paths will replace C drive paths in BricsCAD’s SETTINGS command.
I like to do my testing using this approach:
Install BricsCAD on client machine. If you haven’t already done so.
Make changes with Settings. On my own machine using all the custom folders I prepared in the step above.
Test for a day or two. Does anything mess up? If so debug and fix as appropriate, if not proceed to the next step.
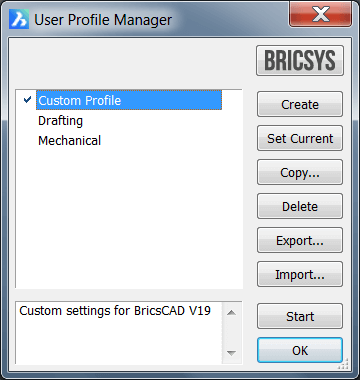
Try on another user’s machine. By using the ProfileManager you can export an ARG file from the custom profile you created in the prior step, then go to the other user’s machine and use ProfileManager to import that ARG file. This will allow you to test the exact same settings on the other user’s machine.
 The PROFILEMANAGER command allows you to import profiles created in the SETTINGS command.
Repeat until stable. Even though it may take a few tries to get things right it is far better to test everything now with two users involved than having a mistake installed on 10, 20 or 100 user’s desktops, right?
Peripherals/Drivers: Test Your Outputs
As a function of the prior step you will have setup paths for your plotter devices. Be sure that you actually plot to those devices and verify the output now so you don’t experience mass plotting problems later.
Summing Up
Now that you’ve got BricsCAD working it is time to take testing to the next level by conducting a pilot training and project study which we’ll talk about in the next installment.
Ready to try BricsCAD?
Easy to try, easy to buy, easy to own. That’s BricsCAD. Try all of our products, for free for 30 days at www.bricsys.com. Freedom of choice, plus perpetual (permanent) product licenses that work with all languages, in all places. You’ll love what we’ve built for you with the BricsCAD V19 product family.

 The PROFILEMANAGER command allows you to import profiles created in the SETTINGS command.